
Disabling certain built-in Windows features can improve your security, reduce data collection, and boost overall system performance. Windows 11 includes many background functions that personalise your experience, track activity, and index content, often using more resources than necessary. By turning off the features you do not need, you can keep your device faster, quieter, and more private. This guide explains which settings to review and how each change helps you get more control over your PC.
1. How to reduce Windows 11 telemetry
Windows 11 does not allow you to completely disable telemetry, but you can limit it significantly by adjusting the Diagnostics & feedback settings.
In Settings → Privacy & security → Diagnostics & feedback, turn off the following:
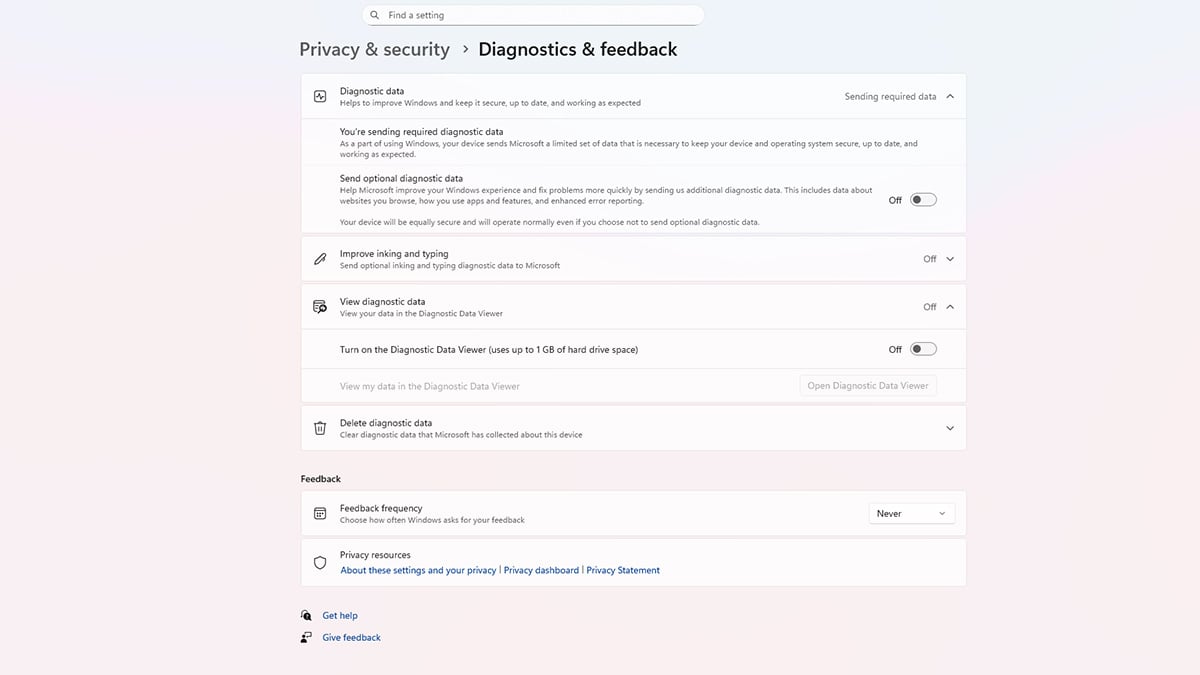
- Under Diagnostic data: Turn Send optional diagnostic data Off to stop Windows from sending extra information such as app usage and enhanced error reports.
- Under Improve inking and typing: Turn Send optional inking and typing diagnostic data Off, which prevents Windows from collecting details about how you type or use a stylus.
- Under View diagnostic data: Turn Diagnostic Data Viewer Off so Windows does not store diagnostic logs locally (this feature can use up to 1GB of storage).
- Delete diagnostic data: Click Delete to remove any diagnostic information your device has already collected.
- Feedback frequency: Set Windows should ask for my feedback to Never so Windows stops prompting you and sending extra contextual data along with those requests.
These settings will help minimize Microsoft’s data collection and reduce background telemetry on your device.
Once you’ve limited the diagnostic data Windows collects, you can take things a step further by turning off the advertising and recommendation features that also rely on your personal usage data.
Disable advertising ID, personalized tips, and product recommendations

- In Settings, go to Privacy & security → Recommendations & offers.
- Turn Off:
- Personalized offers
- Allow websites to access my language list
- Improve Start and search results
- Show notification in Settings (required notifications will be shown even if this setting is off)
- Recommendations and offers in Settings
- Advertising ID
Disabling these features helps reduce data collection, prevents personalized tracking, and minimizes distractions from unwanted notifications or suggestions. It’s a quick way to enhance your privacy and streamline your Windows experience.
2. Turn off auto-connect for Wi-Fi networks

Windows 11 will automatically reconnect to Wi-Fi networks you’ve used before, even if they are slow, insecure, or not the one you prefer. Turning off auto-connect helps prevent your device from joining unwanted networks and reduces background data activity.
To disable auto-connect for a specific Wi-Fi network:
- Click the Wi-Fi icon on the taskbar.
- Click the arrow next to your Wi-Fi name to open the full list of available networks.
- Find the network you are currently using and click Properties.
- Turn Connect automatically when in range Off.
This stops Windows from reconnecting to the network without your approval.
To remove auto-connect networks you no longer use:
- In Settings, go to Network & internet → Wi-Fi.
- Click Manage known networks.
- Choose the network you don’t want to auto-join.
- Turn Connect automatically Off, or click Forget to completely remove it.
This prevents Windows from silently reconnecting to old cafés, airports, hotels, or public hotspots.
3. Turn off Network Discovery
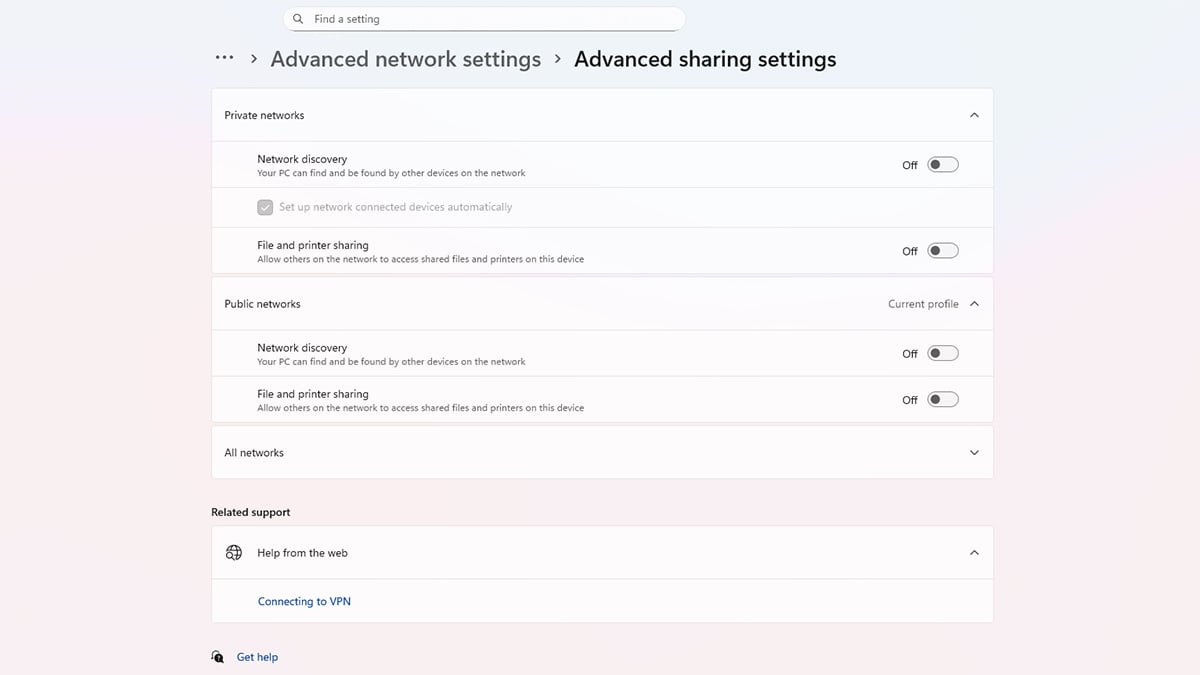
Network Discovery allows your computer to be visible to other devices on the same Wi-Fi network. While this is useful at home for printers or file sharing, it is unnecessary on most networks and increases how much information your device broadcasts. Turning it off helps reduce background network chatter and prevents your PC from being discoverable on public or shared Wi-Fi.
To turn off Network Discovery:
- Open Settings by pressing Windows key + I.
- Go to Network & internet → Advanced network settings.
- Under More settings, click Advanced sharing settings.
- Expand Private networks and turn Network discovery Off. This hides your device from other users on your home network unless you specifically need sharing features.
- Expand Public networks and make sure Network discovery is also Off.
This is the most important one — it prevents your laptop from being visible in places like cafés, hotels, airports, and coworking spaces.
Disabling Network Discovery limits how much your computer announces itself to others and reduces unnecessary network traffic. It’s a simple way to improve privacy and lower your exposure on shared or public Wi-Fi.
4. Turn off Location access

Windows uses your device’s location for apps, advertising, recommendations, and system features like Weather or Find My Device. If you don’t need these services, turning off Location reduces background data sharing and keeps your movements more private.
To turn off Location in Windows 11:
- Open Settings with Windows key + I.
- Go to Privacy & security → Location.
- Turn Location services Off. This stops Windows and most apps from accessing your device’s location. Turning this Off will also turn off Let apps access your location.
- If you decide to keep Location services On. Under Let apps access your location, you can pick and choose to turn Off apps that you don’t want tracking you. This ensures individual apps can’t request or use your location in the background.
- Under Default location, click Set default and choose None (or leave it unset). This prevents Windows from guessing a fallback location.
Turning off Location prevents Windows and apps from tracking where you are or when you move between places. It’s one of the most effective ways to reduce background data collection and improve your overall privacy.
5. Disable Windows Search (optional)

Windows Search constantly indexes your files in the background to make search results appear faster. This feature can be helpful, but it also creates steady disk activity, sends some usage data to Microsoft, and increases overall background processes. Turning it off can reduce telemetry, lower CPU usage, and improve privacy, especially if you do not rely on the search bar often.
To turn off Windows Search indexing:
- Press Windows key + I to open Settings.
- Go to Privacy and security → Search.
- Under Find my files, choose Classic instead of Enhanced. This limits indexing to a few basic folders and stops Windows from scanning your entire PC.
- Scroll down to Exclude folders from enhanced search. Click Add an excluded folder and add any folders you do not want Windows to index.
The more you exclude, the less background indexing occurs. - To completely disable indexing:
- Press Windows key + R, type services.msc, and press Enter.
- Scroll down and find Windows Search.
- Double-click it, set Startup type to Disabled, then click Stop.
This turns off the indexing service and prevents it from starting in the future.
Disabling Windows Search reduces how much your system scans, indexes, and reports usage patterns in the background. If you rarely use Windows Search, this adjustment can noticeably lower background activity and help limit telemetry.
6. Turn off Windows Recall (only available on Copilot+ PCs)
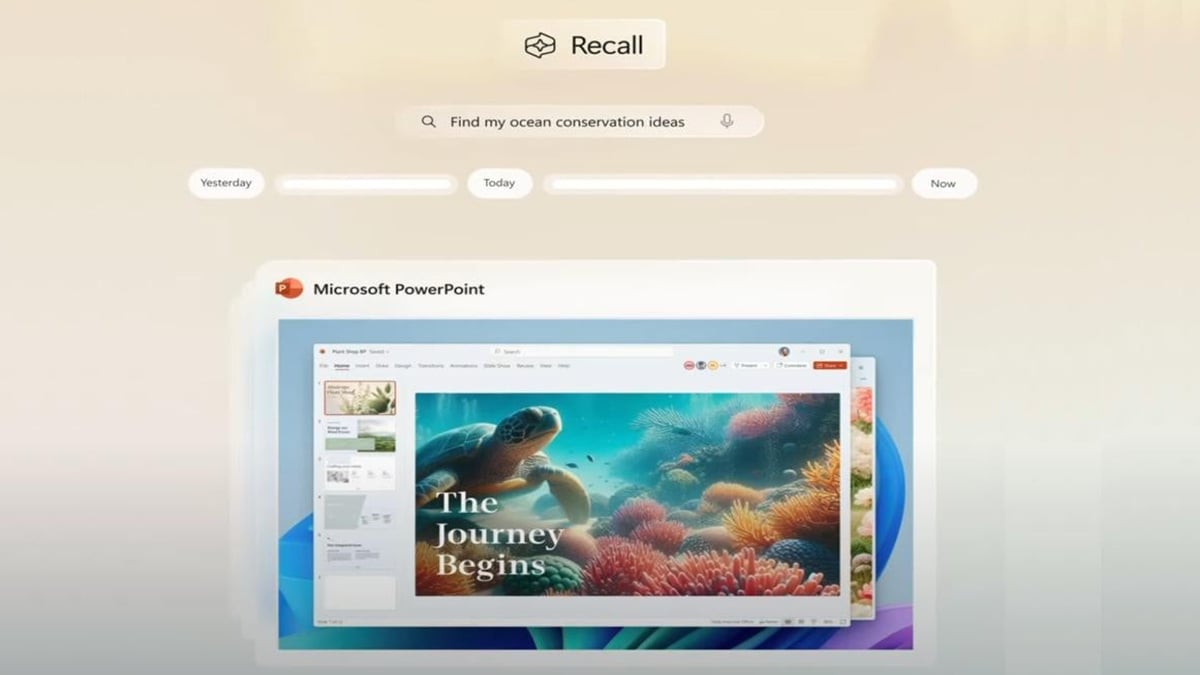
Windows Recall is not available on most Windows 11 devices. It only runs on specific hardware called Copilot+ PCs, which include a powerful neural processing unit and meet strict system requirements. If your device is not a Copilot+ PC, Recall will not appear in your settings and you can skip this section.
If you do have a Copilot+ PC and choose to opt in, Recall takes regular screenshots of your activity and stores them locally on your device. Turning it off prevents new snapshots from being saved and removes any existing ones.
Recall is only available if your computer meets all of these requirements:
- You must be using a Copilot+ PC
- The device must meet the Secured-core standard
- A 40 TOPS NPU
- 16 GB RAM or more
- 8 logical processors
- 256 GB storage (with at least 50 GB free to enable snapshots)
- Windows Hello Enhanced Sign-in Security enabled
- Device Encryption or BitLocker turned on
If any of these are missing, Recall will not appear.
How to turn off Windows Recall
If Recall is enabled on your device, you can turn it off in Settings.
- Press Windows key + I to open Settings.
- Go to Privacy and security → Recall and snapshots.
- Turn Save snapshots Off.
This stops Windows from taking new screenshots of your activity. - Scroll down to Delete snapshots.
- Select Delete all to remove everything that has already been captured.
- If Recall appears on your taskbar, turn Open Recall Off in taskbar settings to hide the shortcut.
How to completely remove Recall (only on Copilot+ PCs)
If you prefer to disable the feature entirely:
- In the taskbar search box, type Turn Windows features on or off.
- Open the Windows Features window.
- Uncheck Recall.
- Restart your PC.
Any saved snapshots will be deleted automatically.
Turning off Recall prevents Windows from capturing your screen activity, reduces background processing, and ensures no snapshots are stored on your device. This is a strong privacy improvement if you use a Copilot+ PC.
Conclusion
Disabling the built-in Windows features covered in this guide is a simple way to improve both your security and your system’s performance. By reducing unnecessary data collection, limiting background activity, and turning off features you do not actually need, your PC becomes faster, quieter, and more private. These adjustments do not break core Windows functions. Instead, they help you run a cleaner setup that protects your information and keeps your device focused on the tasks that matter most.
Recommended Products


