
If you are still running Windows 10, now is the time to prepare for the upcoming end of service (EOS) in October 2025. Creating a Windows backup now, while your PC is still on Windows 10, ensures you capture your current system exactly as it is before upgrading to Windows 11 or replacing your device. A proper computer backup keeps your personal data safe, easy to restore, and ready to transfer to a new system if needed.
Why backups are important before Windows 10 EOS
When Microsoft ends support for Windows 10, security updates will stop, which will make your system more vulnerable to malware and cyberattacks. If you plan to upgrade to Windows 11, things can still go wrong during the process such as failed installations, corrupted files, or compatibility issues that can leave you with missing data.
That is why a data backup and recovery plan is essential. By saving your documents, photos, videos, and other important files in advance, you protect yourself from accidental loss and make it easier to move your data to a new PC. If your current device cannot run Windows 11, you can still create a full system backup on Windows 10 and then restore everything on a replacement computer.
What should you back up
Before upgrading, focus on creating a data backup of your most important files. These are the items you will want to access immediately after moving to Windows 11 or setting up a new computer.
- Documents – Word files, PDFs, spreadsheets, and other work or school materials.
Photos and videos – Personal photos, project videos, and any media that is not stored in a cloud service. - Music and audio files – Songs, recordings, and podcasts stored locally.
Emails and contacts – Export from your email client if you use Outlook or other desktop-based programs. - Downloads – Any installers, invoices, or digital receipts you may need later.
- Custom folders – Game save files, design projects, code repositories, and other personal work.
In addition to personal files, consider making a Windows backup of your system settings and application data. This ensures that your software preferences, desktop layout, and other custom configurations can be restored if something goes wrong during the upgrade.
How to back up on Windows 10
There are several ways to create a Windows backup before upgrading to Windows 11. The best approach is to use more than one method so your files are protected in different locations.
1. Use OneDrive for cloud backup
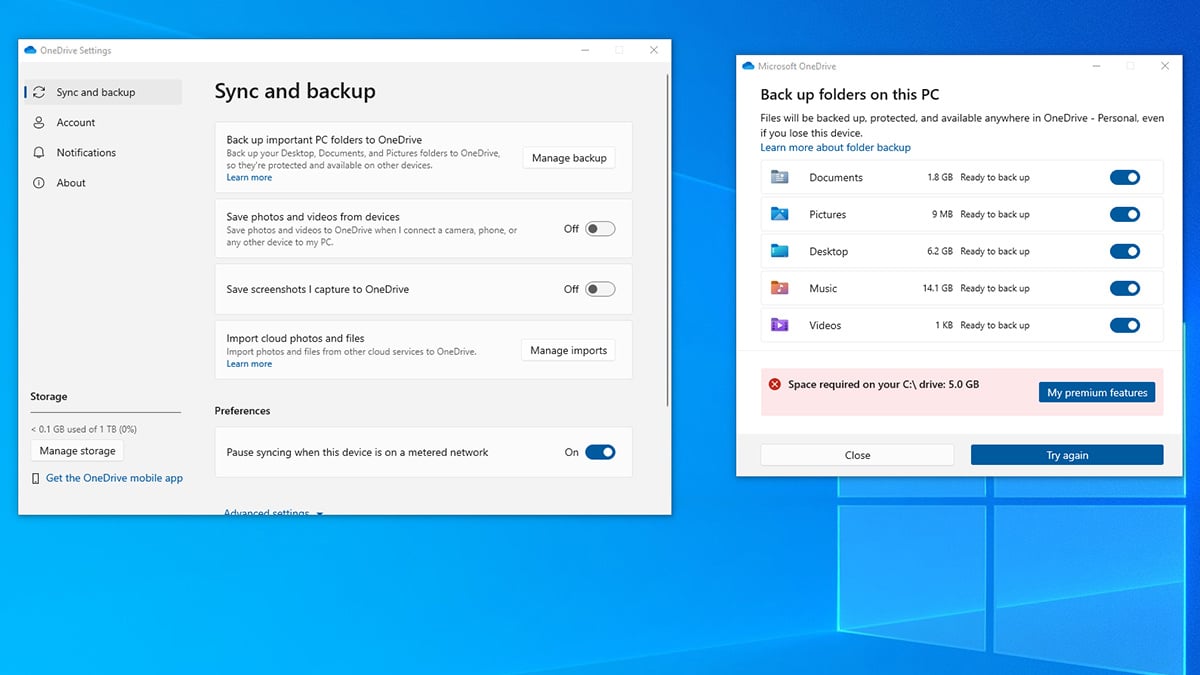
OneDrive is Microsoft’s built-in cloud storage service that comes with all Microsoft accounts. It automatically saves your files online so you can access them from any device.
- Sign in to your Microsoft account on your Windows 10 PC.
- Select the OneDrive cloud icon in the taskbar.
- Go to Settings > Sync and backup > Manage backup.
- Turn on backup for Desktop, Documents, Pictures, Music, and Videos.
- Wait for files to fully sync before starting your Windows 11 upgrade.
Using OneDrive is one of the simplest data backup and recovery methods because your files remain safe even if your PC fails during the upgrade.
2. Copy files to an external drive
An external hard drive or USB drive is an easy and reliable computer backup option.
Option 1: Manual copy

- Connect your external drive to your PC.
- Open File Explorer and select the folders you want to save, such as Documents, Pictures, and Videos.
- Copy them to the external drive.
- Safely eject the drive and store it in a safe place.
This method does not rely on an internet connection and gives you physical control over your data back up.
Option 2: Use File History for automatic backups
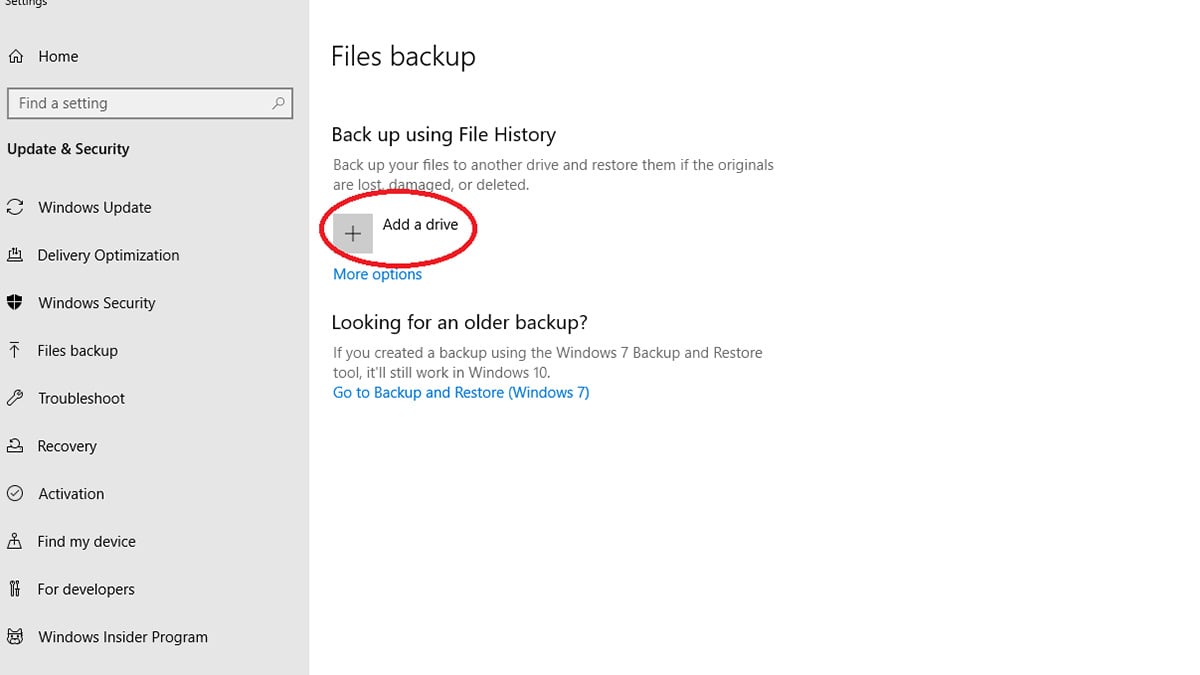
Windows 10 includes a feature called File History that can automatically save copies of your files to an external drive.
- Go to Settings > Files backup.
- Select Add a drive and choose your external drive.
- Click More options to set how often files are backed up and how long versions are kept.
With File History, you can restore previous versions of files or recover deleted items without having to copy everything manually.
3. Create a full system backup with Windows 10’s Backup and Restore tool
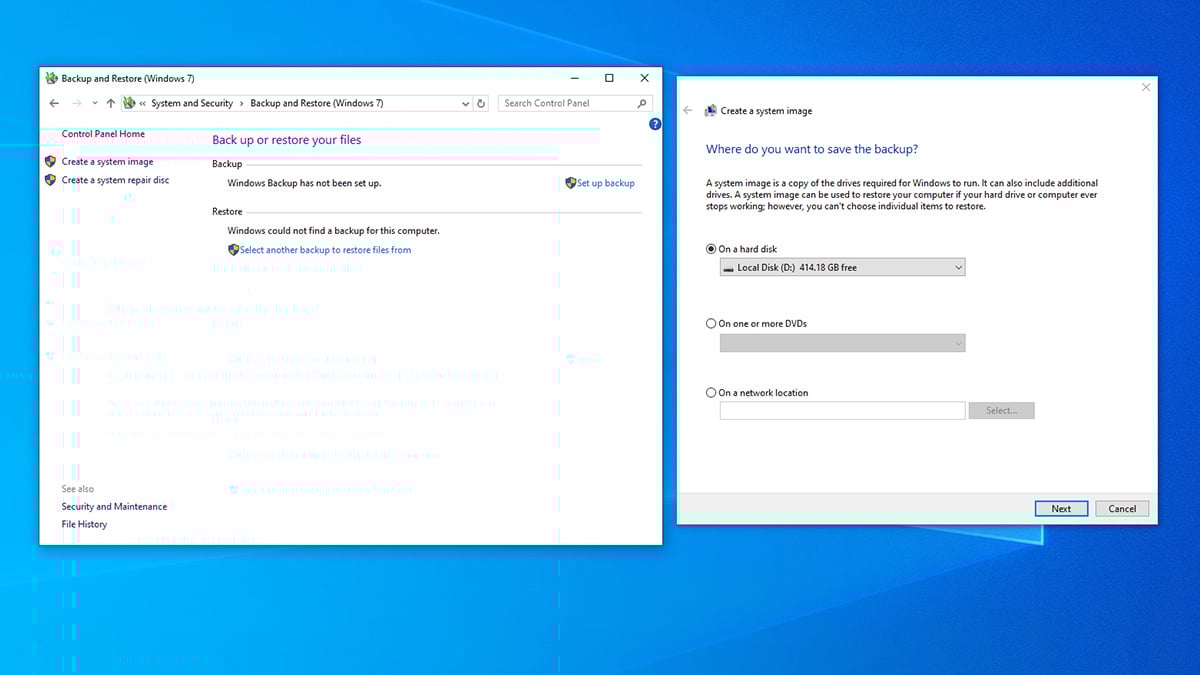
Windows 10 includes a built-in backup feature called Backup and Restore. In the Control Panel it appears as “Backup and Restore (Windows 7),” but it works perfectly on Windows 10. You can use it to create a complete system image, which is helpful if you need to roll back to Windows 10 after upgrading.
- Open the Control Panel and under System and Security select Backup and Restore (Windows 7).
- Click Create a system image from the left menu.
- Choose your external drive as the backup location.
- Follow the prompts to complete the process.
A system image contains all your files, settings, and installed programs, so you can restore your entire PC to exactly how it was before the upgrade.
Remember the Windows 10 end of service date
Microsoft will end support for Windows 10 in October 2025. If you create a Windows backup now, you will be ready to upgrade or replace your PC without risking data loss. Some users can get a free extra year of security updates. Follow this guide on how to get free extended security updates for Windows 10 to see if you qualify.
If your computer cannot run Windows 11, consider buying a new Acer device and transferring your files from your backup.
Before you finish, take these two final steps to make sure your backup is truly ready:
- Verify your backup – Open your external drive or cloud folder and check that your documents, photos, and other key files open correctly. This ensures your data backup and recovery process will work if you ever need it.
- Create a recovery drive – In Windows 10, search for “Create a recovery drive” in the Start menu. Use a blank 16 GB or larger USB drive, and make sure “Back up system files to the recovery drive” is checked. This gives you a bootable tool to fix startup problems or restore your PC if the upgrade fails.
By completing these steps now, you protect your files, reduce the risk of upgrade issues, and make the move to Windows 11 or a new PC as smooth as possible.
Recommended Products