Keeping your desktop PC clean and dust-free is vital for peak performance and long-lasting hardware. Dust build-up inside your computer hinders airflow and increases the temperature. This stresses the components and raises the risk of overheating, which can slow down your machine, cause shutdowns, and even permanent damage.
Regular cleaning keeps your computer's temperature in check, ensuring it runs efficiently and lasts longer. Cleaning your PC is a simple 20-minute task that uses a few basic tools. Our guide will show you how to effectively clean your desktop PC to keep it running like new.
What are the benefits of a clean desktop PC?
A clean PC boasts three major perks:
- Improve performance: Dust hinders airflow and insulates heat. This causes your hardware to work harder and struggle to maintain its usual speed. A clean PC ensures faster processing speeds as all components function efficiently.
- Extend lifespan: Minimize the wear and tear on your components. Dust-free environments help keep temperatures down, reducing the thermal stress on the hardware.
- Reduce overheating: Dust build-up can clog fans and heatsinks, increasing internal temperatures. Overheating causes your system to reduce its performance or, in extreme cases, suffer permanent damage.
Regular cleaning helps prevent these issues, ensuring your PC stays cool and operates efficiently.
How often should I clean my desktop computer?
As a rough guide, clean your computer every 3 to 6 months. If your computer lives on the floor, you'll want to clean it more frequently, as dust and debris accumulate quickly.
Our advice: clean your computer now and then check again in 4 months. If you notice significant dust and debris build-up, aim to clean it every 2 months. But if your computer still looks tidy and dust-free, you can wait up to 6 months before cleaning again.
How to clean your PC
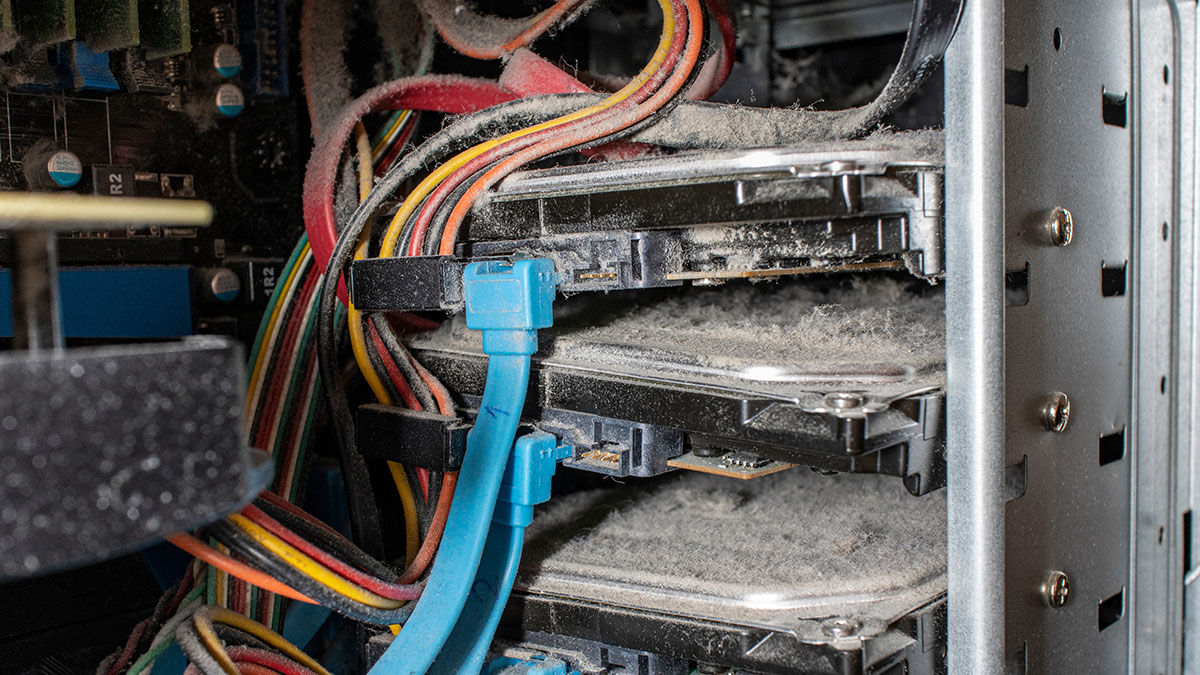
When cleaning your desktop, you want to ensure smooth airflow – cool air flows into the case, and hot air travels out. Clogged dust filters or excessive dust around heatsinks impede this process, potentially causing system overheating. To avoid this, focus on removing all dust so your PC's interior is clean for optimal performance.
Note: When cleaning your PC or its components, you must take extra special care about static damage. You create static electricity when your clothes rub against each other, and this charge can destroy the computer circuits when they are touched.
An anti-static wristband is ideal, but if you don't have one to hand, regularly ground yourself by touching your case or PSU housing.
PC Cleaning Tools & Equipment:
To effectively clean your desktop PC without causing damage, here's what you should have on hand:
The Essentials:
- Microfibre or soft, lint-free cloth: For wiping down surfaces and removing dust from exterior components.
- Compressed air: To blast away dust from hard-to-reach places and delicate areas without physical contact.
- Small brush or toothbrush: Ideal for gently cleaning heatsinks, fans, and other small components.
Additional Tools (Optional):
- Isopropyl alcohol: A mild cleaning solution that removes stubborn grime and fingerprints from surfaces without harming your PC.
- Cotton swabs: Great for cleaning tight spaces and applying isopropyl alcohol to specific areas.
- A mini vacuum/blower: Useful for removing larger debris and dust from the bottom of the case but use caution to avoid static build-up.
- Anti-static wristband: To prevent the build-up of static electricity, which can damage sensitive electronics. You can also touch your metal case to ground yourself if you do not have an anti-static wristband.
- A screwdriver: Depending on your case, you may need a screwdriver to open it.
- Dust mask or respirator: to prevent inhaling debris while cleaning your case.
Step 1: Unplug your PC and move to your workspace
- Power off your PC and disconnect the power cable from the back.
- Remove your mouse, keyboard, and any other connected peripherals.
- For extra safety, unplug all other cords and any USBs. You may want to take a photo to remember the cord locations.
- Move your computer to a well-ventilated area such as a balcony, patio, or garage. As the compressed air dislodges dust from the computer case into your surrounding area, ensure it is somewhere you don't mind getting dirty.
- Put on a dust mask to prevent inhaling debris while cleaning your case.
- Ground yourself with an anti-static wristband to avoid damage to your PC's sensitive electronics.
Note: Never clean your PC when electricity is flowing through it.
Step 2: Open your PC case
- Carefully remove the side panels from your desktop PC's case by loosening screws or thumb screws.
- Some case models allow you to remove the front panel to access specific components like front-mounted fans or dust filters.
- Remember not to damage any attached cables or wires when removing panels.
- Assess the dust build-up inside your PC before starting to clean.
Step 3: Remove components
You can often do a pretty good clean without removing any components. But if your PC hasn't been cleaned for a while, you'll need more than a quick cleaning.
How to remove PC components:
- Carefully remove easily detachable components like RAM, video cards, and hard drives for a deeper clean. This step is optional.
- Do not remove the CPU (central processing unit), as it requires thermal paste for reattachment.
- Place the components on a non-conductive, static-free surface, like an anti-static mat.
- Wipe them down: Use your microfibre cloth to wipe down any dust build-up.
Apply alcohol to tackle stubborn grime: Employ cotton swabs dipped in isopropyl alcohol to gently clean fingerprints or oily residue. Ensure the components are dry before reassembling your PC.
Step 4: Get rid of the dust
Dust is one of the biggest adversaries in maintaining a clean PC, as it tends to accumulate everywhere. Use canned or compressed air to remove build-up inside your computer's case for thorough cleaning.
- Use compressed air and direct short three to five-second bursts around each component. Hold the can about 4 to 6 inches away and ensure dust blows out on the opposite side. Insert the can's straw into the nozzle for better accuracy.
- Focus on the power supply, case fans, and storage drive bays, giving them a gentle blast of air.
- Fans: Prevent fans from spinning while spraying by holding them in place with a cotton swab or your finger. Be extra cautious with the fans— too much pressure might force them to spin and generate electricity, potentially damaging your PC components. To remove dirt stuck onto the PC's fans, use your toothbrush or small brush to scrub it off.
- RAM: Wipe your RAM sticks with your microfibre cloth and spray them. Also, blast air into each RAM slot.
- PSU: The PSU interior can't be cleaned safely without voiding the warranty or risking damage. Instead, use compressed air with its long straw to dislodge stubborn dust. When you power up the PC, its fan and natural airflow should expel the loosened dust.
- Don't forget the bottom of the case! Aim for a burst of air there to remove any lingering particles.
- Vacuum any dust on the floor but avoid using it directly on your PC's interior to prevent damage from static electricity.

Canned Air Usage Tips:
- Before you blast canned air into your computer, test-spray in a safe direction to ensure there isn’t any liquid in the nozzle.
- Hold the can lower than a 40-degree angle.
- Avoid spraying canned air upside-down, as this shoots liquid from the can.
- Use short, controlled three to five-second blasts for best results. Continuous spraying significantly decreases the generated air pressure as the can becomes too cold.
- Work in a well-ventilated space and avoid skin contact or inhalation of canned air. Keep your face away from the PC case while spraying.
Step 5: Reassemble your PC
- Once everything is clean, take a final once-over with your flashlight to ensure everything looks clean.
- Carefully reattach the side panels, ensuring they fit snugly in their grooves. Secure them with clips or screws, then reconnect the power cable and all peripherals.
- Now tackle cleaning your keyboard.
You're now equipped with the knowledge to effectively clean your PC's interior. Elevate your desktop off the floor and minimize pet contact to reduce dust intrusion. Regular maintenance will prevent excessive dust and prolong your system's life.
While you've tackled the hardware, consider giving your software some TLC as well. Uninstalling outdated apps and freeing up space can rejuvenate your computer, ensuring a smooth and efficient performance.