Changing the language system on a Windows 11 computer is simple once you know where the settings are. Whether you bought a PC overseas, need an extra keyboard for bilingual work, or want to learn a new language, Windows 11 lets you switch your display language with only a few steps. This guide explains how to change Windows language settings, how to download new language packs, and what to do if parts of your PC stay in the original language.
Where to download language packs
Windows 11 includes dozens of language packs, but you need to download them before you can switch your display language. These packs change the interface for menus, notifications, the Start menu, File Explorer, Settings, and more.
Here is how to download a language pack:
- Open Settings.
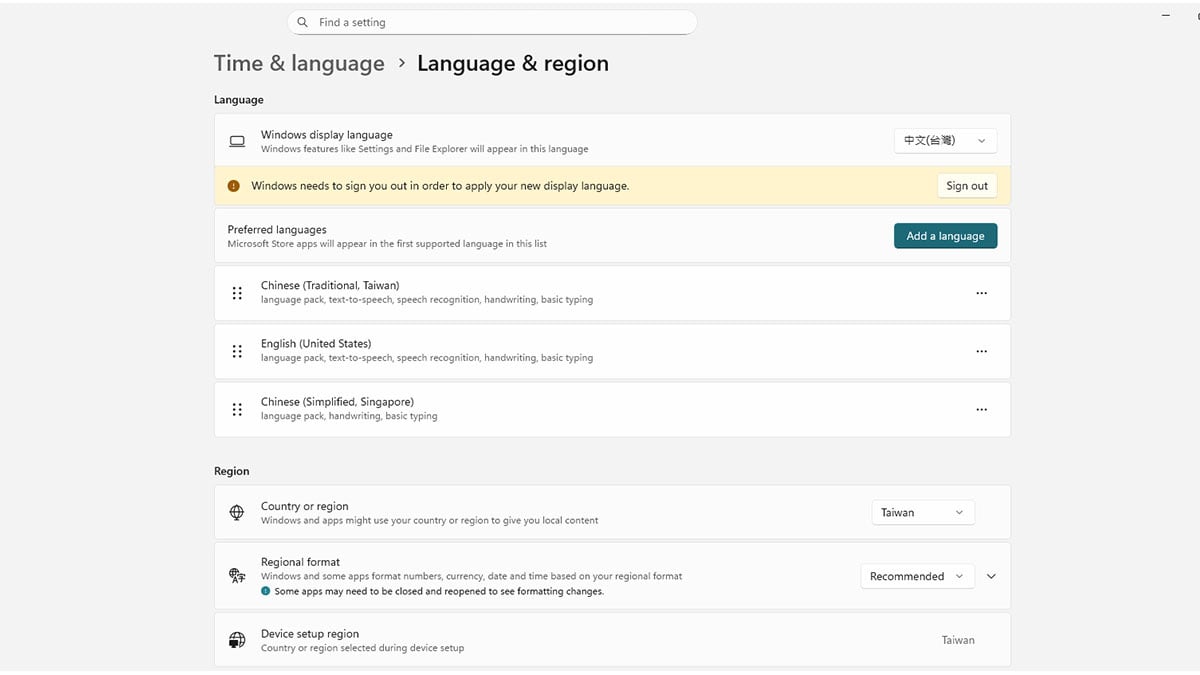
- Click Time & language on the left.
- Select Language & region.
- Under Preferred languages, click Add a language.
- Search for the language you want.
- Select it and click Next.
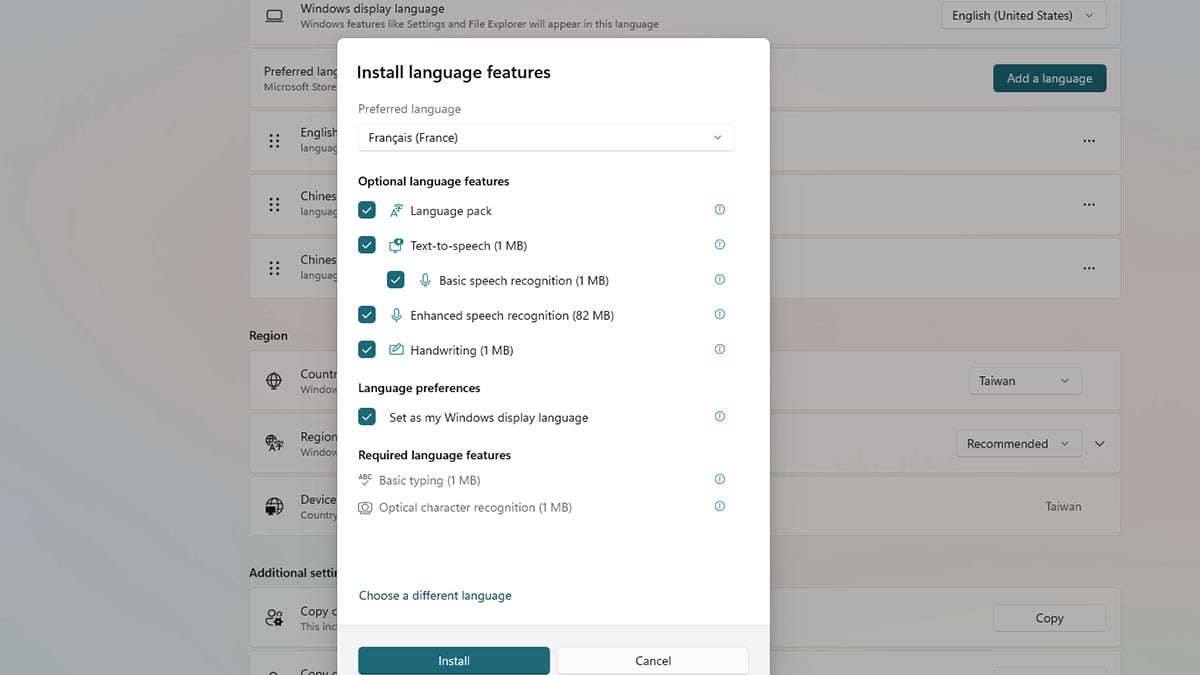
- Make sure Language pack is checked.
- Choose any optional features you want, such as:
- Language pack
- Text-to-speech
- Speech recognition
- Handwriting
- Click Install.
The download size is usually between 100 MB and 300 MB. Some languages also include speech recognition or handwriting support. You can install these features to improve dictation, voice typing, and pen input.
If your PC is managed by a company or school, you may need administrator permission to add languages.
How to change your OS language in Windows 11
Once the language pack is installed, the next step is to make it your Windows display language. This controls how Windows shows menus, system messages, Settings pages, notifications, and most built-in apps. Changing the display language here is the core step that updates the overall experience across your computer.
Follow these steps:
- Open Settings.
- Select Time and language.
- Choose Language and region.
- Under Windows display language, select the new language from the drop down menu.
- Sign out and sign back in so Windows can apply the changes.
After you sign back in, the interface should appear in the new language. This includes system menus, quick settings, the lock screen, and many built-in apps.
Another option is to change the display language while installing the language pack. When the download screen appears, check Set as my Windows display language before clicking Install.
Why Windows sometimes stays in the original language
Even after you change Windows language settings, it is possible to see parts of your PC still showing the old language. This happens for a few reasons.
1. Missing language features
If the typing tools, handwriting tools, or speech features are not installed, Windows may not change everything.
2. Apps that do not follow system language
Some older desktop apps only support one language and will ignore your settings.
3. System components that need a full restart
Certain parts of Windows only update after a reboot.
4. Microsoft account sync settings
If language preferences are synced across your devices, Windows may switch back to your old language.
5. Region settings do not match your language
A mismatch between your language and region can cause some interface elements to remain unchanged.
6. Windows version limitations
Devices configured with region-locked ISOs or company policies may not allow full language switching.
How to fix language problems in Windows 11
If you still see the old language after switching, try these solutions.
1. Install all language features
Go to Settings → Time and language → Language and region.
Select your language, then open Language options.
Make sure these items are installed:
- Language pack
- Basic typing
- Handwriting
- Speech
2. Set your language as the top priority
Move your new language to the top of the Preferred languages list.
3. Restart your PC
A full restart helps Windows reload system components.
4. Adjust your region settings
In Language and region, make sure Country or region and Regional format match the language you want to use.
5. Turn off language sync
Go to Settings → Accounts → Windows backup. Turn off Remember my preferences, then uncheck Language preferences.
6. Reinstall the language pack
Remove the language and add it back again.
7. Update Windows
Go to Windows Update and install the latest updates. Some language fixes are included in system patches.
Advanced fix: using PowerShell to force Windows to apply the full language pack
If none of the normal methods work, there is an advanced solution discovered by a Reddit user heltonfonias. In some cases, the Settings app installs only a partial version of the language pack, which causes parts of the interface to stay in the original language. This PowerShell method forces Windows to install the complete language pack and then applies it across the entire system, including the welcome screen.
Important warnings
- Only use this method if standard settings do not work.
- You must run PowerShell as Administrator.
- The process may look frozen for up to 20 minutes.
- Back up your important files before making system-wide changes.
- Your PC will restart automatically.
What this method does
- Installs the complete language pack.
- Sets the language as your user display language.
- Applies the language to the system account and welcome screen.
- Forces a system reboot to complete the process.
PowerShell script (advanced users only)
Replace "pt-BR" with the language code you want, such as "en-US" or "fr-FR".
# --- Variables ---
$targetLanguage = "pt-BR" # Replace with your preferred language code
# --- Install the full language pack ---
Install-Language -Language $targetLanguage
# --- Set the Windows display language for the current user ---
Set-WinUserLanguageList $targetLanguage -Force
# --- Apply the language to the system and welcome screen ---
Copy-UserInternationalSettingsToSystem -WelcomeScreen $True
# --- Restart to complete the process ---
Restart-Computer -Force
When this method is useful
Use this script only if:
- Windows Settings installs the language but does not fully switch
- Parts of Windows stay in English or another language
- Your PC was installed using a foreign ISO
- You have tried reinstalling the language pack and restarting without success
For most users, the standard Settings method is enough. This PowerShell option is meant for persistent cases where Windows refuses to change languages properly.
Final thoughts
Changing the display language in Windows 11 is usually quick and simple. Once the language pack is installed, Windows will update menus, system messages, and apps to match your preferred language. If pieces of the interface stay unchanged, adjusting your regional settings, turning off sync, or reinstalling the pack usually solves the problem. For the rare cases where none of these methods work, the advanced PowerShell fix can force Windows to install the full language system and apply it across the entire device.
To learn more about Windows 11 or explore related guides, check out these helpful articles:
Recommended Products