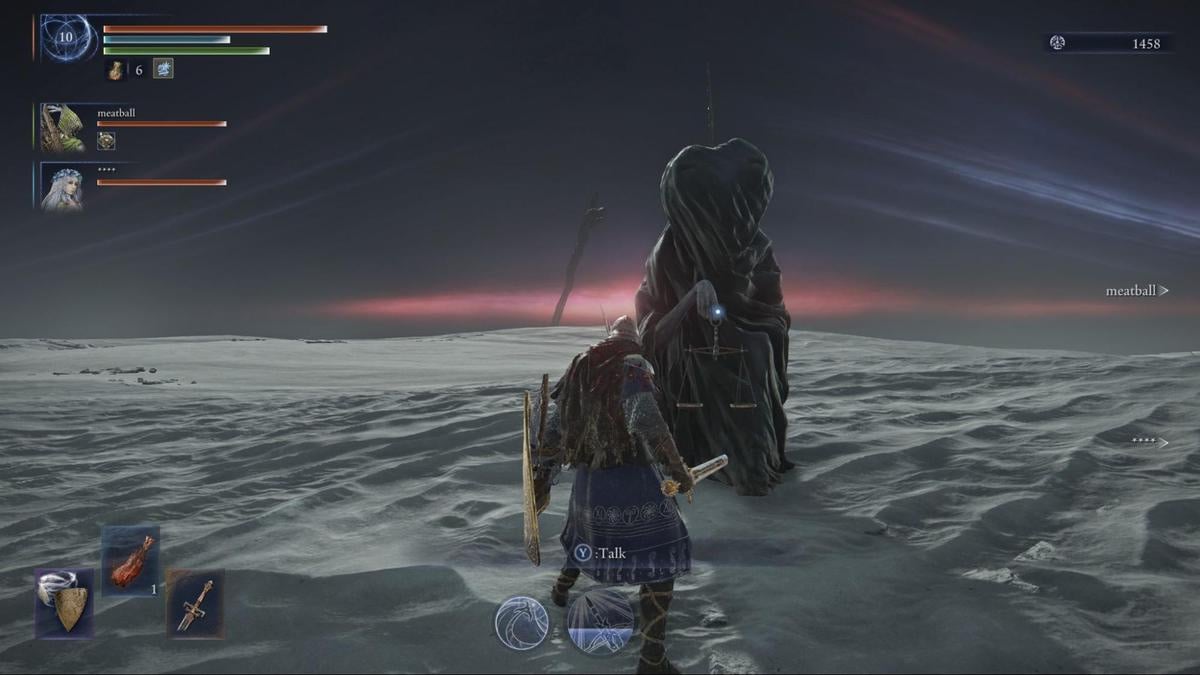
Before the boss fight with Libra in Elden Ring Nightreign, something strange happens. Instead of attacking you right away, Libra appears as a mysterious merchant and offers a deal. Each deal gives you a powerful bonus, but it also comes with a serious drawback. Some boost your stats, give you more flasks, or hand out special weapons. Others lower your health, drain your resources, or even make the fight harder for your entire team. Choosing the right deal can change the fight, especially in co-op, but choosing the wrong one can ruin your run.
To help you make a quick decision, we’ve put together a cheat sheet that lists every Libra deal, along with its benefit and drawback.
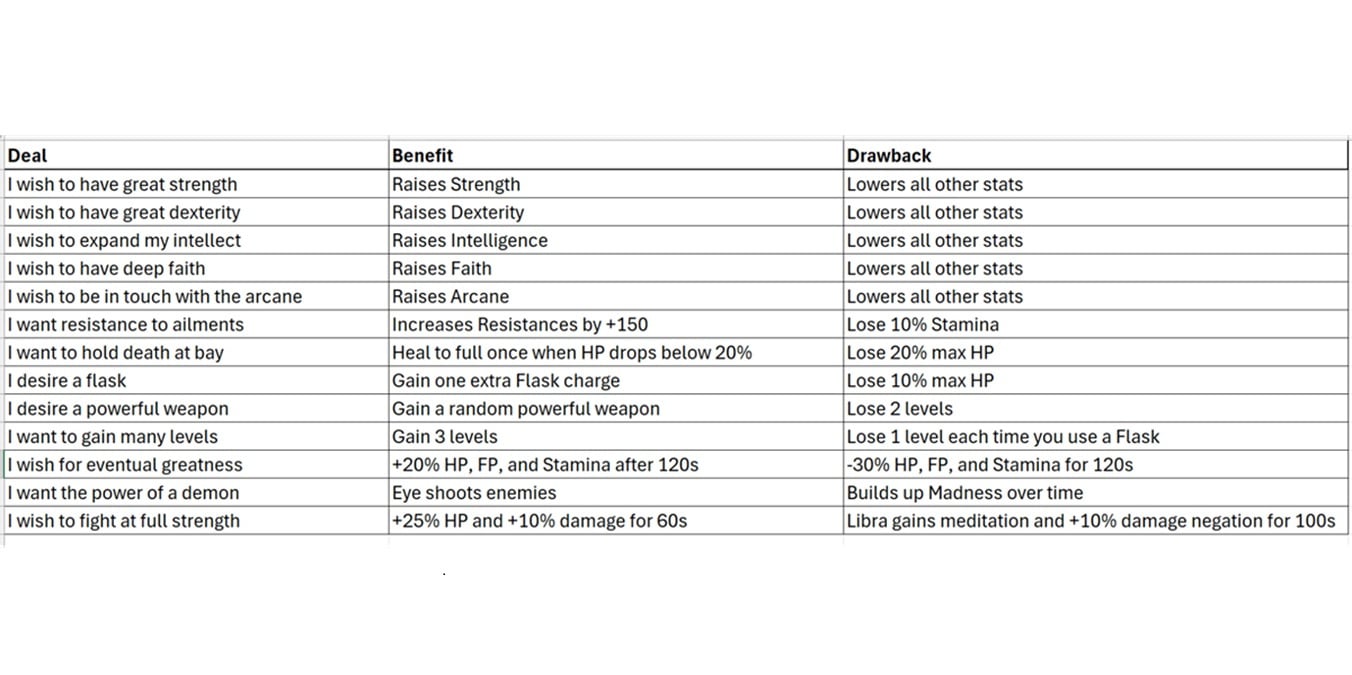
Look through it first if you want a simple overview. After that, we rank all 13 deals from worst to best and explain which ones are worth the risk.
All Libra Deals in Elden Ring Nightreign Ranked from Worst to Best

13. “I want to fight at utmost strength”
This is easily the worst deal Libra offers. It gives you a small buff (more attack, higher madness resistance, and a little extra HP), but the trade-off is a trap. Libra gains a defensive buff that reduces the damage it takes, which cancels out your bonus. In multiplayer, this hurts even more, because the damage resistance affects all players. It’s the only deal that actively punishes your team instead of just affecting you. You might think you're getting stronger, but in reality, you're just making the fight longer and harder for everyone. This can lead to frustration, especially if teammates didn't agree to the risk. If you're playing solo, it's still a weak trade. The gain is minor, and the drawback makes the battle more annoying than exciting. In most cases, you're better off refusing the deal entirely.
12. “I want the power of a demon”
This deal gives you a floating eye that fires projectiles at enemies during the fight. It sounds cool, but it is more trouble than it’s worth. The eye triggers madness buildup on you every time it appears, and the damage it does is very low—often less than a regular light attack. Even worse, the eye can activate before the boss is even fully active, wasting the effect and still building up madness. If you're running a build that already uses madness, this can actually work against you by stacking it too fast and causing a self-inflicted stun. In most cases, the eye is unpredictable, weak, and dangerous. It might look flashy, but it won’t help you win the fight. Unless you have a very specific strategy that can handle the madness buildup, this deal is best avoided.
11. “I want to hold death at bay”
At first, this deal sounds like a safety net. If you die, you get revived. But the problem is, it barely works. The revival doesn't save you from big hits, which means if you take too much damage at once, you still die like normal. On top of that, you lose a level every time you’re brought back. Worse still, there's an item you can buy from a late-game merchant that does the same thing without the level penalty. If you're playing solo, this is even riskier, because you have no one to save you if things go wrong. It’s a poor deal compared to what you can get with smart play and a few in-game purchases. For most players, this option offers false hope and ends up wasting both your time and your build.
10. “I wish for eventual greatness”
This deal gives you a big reward, but only after you survive a dangerous penalty. When you accept it, your max HP, FP, and Stamina are cut in half. After a short time, the full buff activates and restores your stats to higher-than-normal levels. You also gain a powerful passive that fully heals you once when your HP drops to a critical level. The upside is strong, but the risk is real. For a few minutes, you are much weaker and easier to kill. If your team cannot protect you, or if you make one mistake, you might never get to enjoy the reward. This deal is especially dangerous for squishy classes like Revenant or Recluse, though they can recover slightly better due to their unique abilities. Unless you know your build well and have good team support, this trade can be more trouble than it's worth.
9. “I wish to expand my intellect”
This deal shifts your stats to focus heavily on Intelligence, turning your character into a pure sorcerer. It might sound perfect for a caster build, but it comes with a big drawback. To raise your Intelligence, the game lowers your other stats, including Mind, which controls your FP. That means while your spells hit harder, you may not have enough FP to cast them often. If you're not already equipped with high-efficiency gear or a way to recover FP mid-fight, you could end up weaker than before. This deal can work if you already have a sorcerer setup ready, but it is risky for hybrids or support builds. It is not a total trap, but it demands good planning and careful resource management.
8. “I wish to have deep faith”
This option works the same way as the Intellect deal but focuses on Faith instead. It reshapes your stats to suit incantation-heavy builds, boosting your Faith while lowering other attributes. On paper, this could help builds like the Revenant or Recluse, but the same risks apply. You may lose too much HP or FP to safely cast your strongest spells, especially if you're not already specced for healing or support. The worst-case scenario is choosing this option only to realize you no longer have the stats to equip your current gear or cast your key spells. If your build relies on a balance of stats or has limited casting tools, this trade can hurt more than help. It’s slightly more forgiving than the Intelligence swap, but still not a safe pick for most players.
7. “I wish to be in touch with the arcane”
This deal changes your stats to favor Arcane, and it is generally more forgiving than the Intelligence or Faith swaps. Arcane builds have access to a wider variety of weapons that scale well, including strong options like Morgott’s Cursed Sword and Mohgwyn’s Sacred Spear. These weapons can deal solid damage and often apply status effects that are useful against Libra. Unlike the other stat conversion deals, this one usually leaves you with enough HP and FP to stay functional, even if you were not using Arcane before. It is still a permanent change for the rest of the expedition, so picking it without the right weapon can limit your options. But if you’re flexible with your build or already leaning toward Arcane, this can be a smart and low-risk choice. Just make sure your gear can keep up.
6. “I wish to have great strength”
This deal reshapes your stats to favor Strength, giving you the power to wield heavy weapons and deal strong physical damage. Strength builds are simple and effective, and they often have better survivability due to higher poise and armor compatibility. The risk, as always, is that this change is permanent for the expedition. If your previous build relied on magic, ranged attacks, or balanced stats, you might lose access to important gear or abilities. Still, many weapons in Night Reign scale well with Strength, and heavy-hitting moves can stagger Libra and break through its defenses. If you have a weapon that fits the new stat spread, this is a solid and reliable option.
5. “I wish to have great dexterity”
Dexterity swaps your stats to favor speed, agility, and precise weapon types like katanas, curved swords, or claws. This deal is especially strong in Night Reign, since Libra has a slight weakness to slash damage, something most Dexterity weapons deal by default. The change is permanent, but unlike caster-focused swaps, you’re less likely to run into serious FP or stamina issues. As long as you’re not heavily invested in magic or tanky gear, this deal transitions smoothly. It works well for players who want faster attacks, good dodge timing, and flexible weapons. Just double-check your gear before committing to make sure you can take full advantage of the stat shift.
4. “I desire a flask”
This deal grants you one extra flask use, which can make a big difference during tough fights. The cost is a 10 percent reduction in your maximum HP. For tank-focused builds like Raider or Guardian, that HP loss might seem painful. But for most players, especially those with good healing passives or flask recovery buffs, the trade is worth it. The bonus lasts the entire expedition and helps both in boss fights and regular encounters. If you are running a build that burns through FP or takes chip damage often, this deal gives you more breathing room. It also pairs well with team-based healing effects or accessories that restore flasks over time. The value depends on how your build works, but for many players, an extra flask is better than a small chunk of missing health.
3. “I want to gain many levels”
This deal gives you three free levels on the spot, which can provide a big boost to your stats. The downside is that every time you use a flask, you lose one level. That makes this deal risky for players who rely heavily on healing or FP recovery during fights. However, if you are using a build that avoids damage, has strong defensive skills, or includes passive healing, this deal can pay off. It works especially well for characters like the Raider, who can use abilities that reduce or avoid incoming damage. In team play, if you have a teammate who can keep you alive, the pressure to use flasks drops even further. The key to using this deal well is knowing your gear, your passives, and your team. If you are confident in your survival and discipline, this can be one of the most rewarding choices in the game.
2. “I desire a powerful weapon”
This deal gives you a random weapon from a pool of eight, and most of them are strong enough to turn the tide of battle. The selection includes three madness-based weapons and five holy ones. This matters because Libra is weak to holy damage and takes 35 percent more damage from it. If you get one of those, the fight becomes much easier. Even the madness weapons can help if your build supports them. The cost is losing two levels, but this is a fair trade for a weapon that directly targets Libra’s main weakness. The only time this deal might not work in your favor is if you receive a weapon that does not match your build or scales poorly with your stats. Still, most weapons in the pool are flexible enough to be useful. If you feel underpowered or unprepared, this is one of the safest deals to take.
1. “I want resistance to ailments”
This is the best deal Libra offers. It gives you 150 points of status resistance, which heavily reduces the impact of effects like poison, bleed, and especially madness, Libra’s most dangerous tool. The drawback is a small cut to your maximum stamina, but this is easy to manage. You can offset it with gear, passives, or stamina regeneration buffs found during your run. For frenzy-based caster builds, the resistance boost is even better. It lets you cast more safely and gives you more time to build up pressure without self-inflicting a status proc. What makes this deal stand out is that the benefit is consistent, immediate, and useful for any build. It has no setup requirement and does not depend on your stats or equipment. Whether you are playing solo or in co-op, this is the most reliable and least risky option Libra can offer.
Recommended Products


