
Expedition 33 may be one of the most emotionally resonant RPGs of the year, but make no mistake, the game’s beautifully painted world hides some brutal difficulty spikes. From mechanically intense duels to multi-phase nightmares, several bosses in Expedition 33 demand far more than just well-leveled characters. This ranking breaks down the most punishing encounters in the game, ordered by how much they pushed us to rethink strategies, master parries, and in some cases, start over from scratch. Whether you're prepping for New Game Plus or just curious how your experience compares, here's our list of the ten hardest bosses in Clair Obscur: Expedition 33 ranked from tough to downright unforgiving.
Hardest Bosses in Clair Obscur: Expedition 33 Ranked
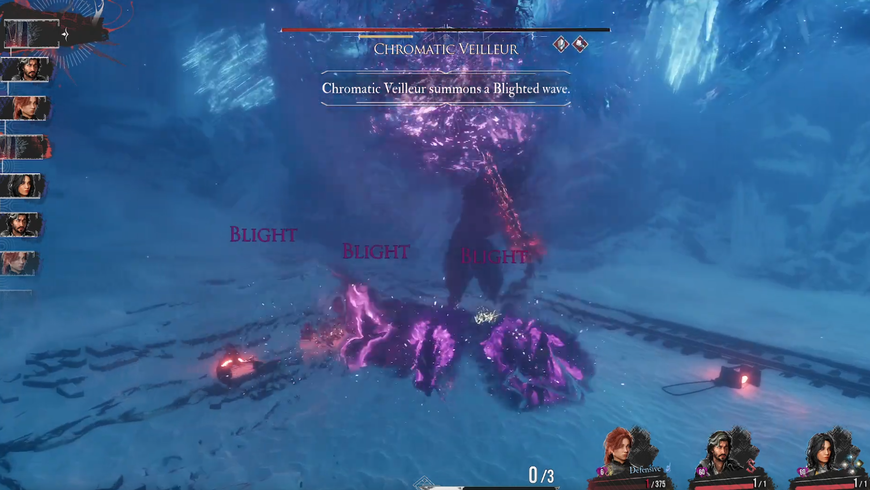
10. Chromatic Veilleur
Location: Frozen Hearts – Glacial Falls / Endless Tower Stage 5-1
Chromatic Veilleur might rank lowest on this list, but it’s still no pushover. Found deep within the frozen ruins of Glacial Falls, this boss introduces one of the nastiest mechanics in the game: Blight. Every turn, it passively spreads this status across your team, steadily reducing each party member’s max HP. Let the fight drag on too long, and you’ll be hanging on by a single hit point.
The trick to surviving is either to purge the Blight consistently or end the fight fast. Bring characters like Lune or equip Luminas such as Cleansing Tint to remove the status before it snowballs out of control. If you’ve picked up the Anti-Blight Picto, this is the time to use it.
Veilleur is weak to both Lightning and Light damage, making Sciel and Lune strong choices. These elements not only speed up the battle, but they also help interrupt the boss’s signature four-hit Blighted Strike. Each hit can be parried individually, but slip up once and you’ll take serious damage on top of the Blight buildup.
While the Veilleur doesn’t have multiple phases or major surprises, its ability to apply pressure through HP reduction makes it a tense encounter. It's a damage race, and if you’re not prepared, you’ll lose by attrition.
9. Chromatic Ramasseur

Location: Visages – Sadness Vale
Hidden just before the end of Sadness Vale, Chromatic Ramasseur is a punishing test of timing and precision. This optional boss relies on long Nevron Arm combos that can span up to eight consecutive strikes, forcing you to master parrying or perfectly time your dodges. Fail to keep up, and you’ll barely get a chance to act before you're overwhelmed.
The fight revolves around pressure. Ramasseur’s chained attacks hit hard and come fast, and unless you parry cleanly through the sequence, you won’t build enough Break to open a damage window. Once stunned, the boss becomes vulnerable for a short burst, so you’ll need to make every counter count.
Occasionally, Ramasseur will mix things up by using Mortal Hit, a single-target move that kills outright if not dodged. The parry timing is razor-thin, so dodging is the safer option, watch for the hand clench and react when you hear the swing.
There’s no status gimmick, no elemental weakness to lean on. This fight is all about focus and rhythm. It’s simple on paper, but few fights in Clair Obscur: Expedition 33 are as demanding when it comes to pure mechanical execution.
8. Serpenphare

Location: White Sands (accessible in Act 3 after unlocking flight)
Serpenphare is one of the flashiest and most chaotic boss fights in Expedition 33. Soaring above the eastern skies of the Continent, this massive serpent can only be engaged midair after unlocking Esquie’s flight ability in Act 3. But once you collide with it, prepare for a battle that revolves entirely around resource control, mobility, and reactive timing.
The defining mechanic here is Serpenphare’s AP drain. At the start of its turn, it absorbs all of your party’s AP, cutting off access to key skills and Luminas. If you go in unprepared, your team will be locked into basic attacks and blocking. The solution? Stack your loadout with AP recovery tools. Luminas like Energising Turn, Energising Attack I, and Energising Parry are critical to regaining momentum. Parrying its multi-hit sequences or dodging effectively can restore enough AP to keep your options open.
Serpenphare is also weak to Lightning, giving Lune a major advantage. Her Lightning Dance and other electric skills deal reliable damage and help trigger status effects. Be sure to equip a Lightning-element weapon to maximize your output during its frequent stun phases.
Interestingly, when Serpenphare absorbs too much AP, it triggers an AP Explosion, dealing damage to both sides. While this can hurt, it also stuns the boss, creating an ideal opportunity to unload your strongest attacks. Luminas like Stun Boost can make this window even more rewarding.
The rest of the fight features a gauntlet of highly animated, multi-step attacks: tail swipes that require alternating dodges and jumps, laser barrages with Gradient Parry timing, and silencing projectiles that limit your spellcasting. Sound cues and precise movement are essential throughout.
Serpenphare isn’t the hardest boss mechanically, but it demands a sharp balance between defense and AP economy. If you build correctly and react with confidence, the fight becomes a satisfying high-speed duel in the skies.
7. Chromatic Creation

Location: Renoir’s Drafts (behind the Paint Spire in the scaffolding area)
Chromatic Creation is a powered-up version of one of the game's earlier bosses, and while its moveset may feel familiar, the fight itself is far more punishing. Found in the depths of Renoir’s Drafts, this encounter features extended combo strings, higher damage output, and added mechanics that force you to stay alert from start to finish.
One of the biggest threats is Inverted, a status effect that turns all healing into damage. This can quickly spiral out of control if you’re relying on standard recovery tactics. Be sure to equip cleanse options like Lune’s Healing Light, the Cleansing Tint Lumina, or similar support tools to avoid losing control of the fight. Chromatic Creation also applies shields to itself frequently, which can waste your strongest attacks unless you bring abilities like Maëlle’s Breaking Rules to remove them.
The good news is that its attacks stick closely to the original Creation’s patterns. You’ll see the same tail swipes, hind-leg kicks, aerial combos, and explosive void orbs, just with longer durations and tighter timing windows. The flying combo in particular demands a mix of dodges, jump evades, and Gradient Parries in quick succession, making it one of the more demanding sequences in this phase of the game.
What makes Chromatic Creation tough is the combination of everything it throws at you. A shielded boss casting Inverted mid-combo can force even experienced players into a defensive scramble. If you’re not actively managing status effects and breaking its shields, you’ll struggle to land meaningful damage.
This fight rewards preparation and discipline. It doesn’t reinvent the mechanics, but it pushes them far enough to make this a solid step up in difficulty.
6. Lampmaster

Location: Painting Workshop (unlocked by using the three Items of the Beast on the statue)
The Painting Workshop version of the Lampmaster is one of the more unusual fights in Clair Obscur: Expedition 33. Unlike most bosses, this enemy doesn’t rely on brute force or status spam. Instead, it introduces a mechanic built around environmental control. If you don’t manage the lamps around it, the fight quickly spirals out of control.
Each time the Lampmaster finishes an attack, it lights up a sequence of lanterns without consuming a turn. These lamps charge its next move and make its ultimate attack, simply called Lamp Attack, significantly more powerful if left intact. The catch is that you must manually destroy the lamps during your own turn using Free Aim shots. Leaving them up means your entire party is exposed to a devastating area-of-effect blast. The visual and audio cues for Lamp Attack are subtle, but crucial, look for the purple burst and listen for the high-pitched zing just before impact to time your parry correctly.
Its regular attacks aren’t exactly mild either. The Lampmaster uses a three-part melee combo that applies Dizzy, a status effect that disrupts your aiming ability. The pattern is left sweep, right sweep, then an overhead smash. Each strike can be parried, but if even one lands, your accuracy will suffer on subsequent turns, making it harder to destroy the lamps precisely.
There’s no elemental weakness to exploit here, and it resists Light damage, limiting some of your go-to builds. Instead, this fight tests coordination and awareness. You’ll need to manage enemy attacks, lamp destruction, and parry timing all at once, with no room for error once the lamps start stacking.
This version of the Lampmaster might not have flashy mechanics or multiple phases, but its control over the battlefield and its ability to punish inattention make it a standout mid-tier challenge.
5. The Paintress

Location: Summit of the Monolith (Final Boss of Act 2)
The Paintress marks a major shift in Clair Obscur: Expedition 33, not just in story but in difficulty. Found at the top of the Monolith after the battle with Renoir, she serves as the final challenge of Act 2. This is the point where the game demands mastery of everything you’ve learned so far, from tight parries to efficient team rotation and resource management.
Her most dangerous ability is Corrupted Chroma, which applies Curse to your entire party. Once active, each character is given a strict four-turn limit before they die, regardless of health. To delay this, you can shoot the orbs of light that appear above her. Doing so grants you two additional turns, providing just enough breathing room to potentially finish the fight.
Parrying plays a key role in this battle. Many of The Paintress's attacks are multi-hit or area-based, and each successful parry allows you to deal damage outside your normal turns. With only a handful of turns to work with, this becomes critical. It’s highly recommended to bring characters who can maximize value even when not actively taking turns.
Another layer of strategy involves preparing a second team. If your first group is wiped out by Curse, your backup party can enter and continue the fight. The effect still applies to them, but this setup gives you a few more chances to win. Equipping the First Strike Lumina ensures your second team can act immediately once they enter the field.
The first phase of the fight is already intense. Spells like Void Meteor, Chroma Waves, Monolith Rocks, and Brush of Light hit hard and often apply debuffs like Powerless, Defenceless, or Burn. Characters like Lune or Monoco are useful here, especially if you need heals that can target the full party. Buffs like Shell or Powerful can also soften the impact of incoming spells.
One important tip is to avoid overspending your AP near the end of phase one. The Paintress will not drop below 10 percent HP and always ends the phase with an attack. Conserve your points to enter phase two with more tactical flexibility.
The Paintress is more than just a late-game boss. She represents the core themes of Expedition 33, urgency, sacrifice, and the pressure of time. This is a turning point where only well-prepared teams and confident players will make it through.
4. Renior (Final Boss)

Location: Return to Lumière (Final Boss of Act 3)
Renoir’s final battle is a culmination of your entire journey through Clair Obscur: Expedition 33. After everything he has taught and taken from you, this two-phase encounter delivers both emotional impact and mechanical intensity. You’ll face him during your return to Lumière, and at this point in the story, there's no turning back.
Make sure your team is properly prepared before initiating the fight. Level 70 is the recommended minimum if you want to deal consistent damage and avoid being one-shot by his stronger moves. If you're not there yet, consider farming the Noire enemies in the Dark Shores. They not only give solid experience but also drop Grandiose Chroma Catalysts, which are essential for upgrading your weapons to level 33.
Renoir’s attacks are mostly parryable, and learning the rhythm of his patterns is key. One move that catches many players off guard is the Slow Swing, which must be jumped over instead of blocked. Timing this wrong can result in instant knockouts, especially if you're caught mid-animation or recovering from another hit.
Throughout the battle, Renoir will summon Visages that provide him with a shield. These must be destroyed quickly using Free Aim or shield-breaking skills like Maëlle’s Breaking Rules. Leaving the shield intact will cause the fight to drag and give Renoir opportunities to chain together dangerous follow-ups.
Phase two begins with Renoir at lower health, but don’t let your guard down. His damage output increases significantly, and attacks like Void Meteors and the Six Hit Combo can wipe out your team if you're not parrying or dodging with precision. Staying aggressive is essential. If you maintain offensive pressure, you can close the fight before he overwhelms you.
The battle ends with a scripted moment where Maëlle intervenes. Once Renoir is at critical health, she steps in to counter his final attack, bringing the fight and his arc to a close. It’s a powerful scene that ties together the themes of legacy, grief, and forgiveness that run throughout the game.
Renoir’s final fight isn’t just a test of skill. It’s a payoff for everything the narrative has built up to this point. Parrying his attacks and pushing through his defenses feels personal, and when the final cutscene plays, it lands with emotional weight that few boss battles can match.
3. Painted Love

Location: Endless Tower, Stage 11 – Trial 3 (accessible after unlocking flight in Act 3)
Painted Love is one of the most intense and visually overwhelming fights in Clair Obscur: Expedition 33. Found at the final stage of the Endless Tower, this battle pits you against the dual force of the Curator and the Paintress, who share a single health bar and unleash a constant barrage of complex, high-damage attacks.
The key to survival here is consistency. Most of their moves hit multiple times and come with layered audio and visual cues. Dodging and parrying are your best tools for mitigation, and you’ll need to be sharp. If your reflexes aren’t up to the task, consider bringing Clea. Her Life, Cheater, and Base Shield Luminas can help stabilize your team by healing fully each turn and shielding against effects like Burn. This setup is expensive, costing 90 Lumina points, but the safety it offers may be worth sacrificing a few offensive upgrades.
Because the boss’s health is shared between both enemies, multi-target attacks are extremely effective here. Use skills that hit both the Curator and the Paintress simultaneously, especially those that inflict debuffs like Burn or Defenceless. Doing so accelerates the fight while reducing the number of actions they can take before your party is overwhelmed.
Painted Love's attack list is extensive, and many moves involve multiple hits, delayed follow-ups, or feint animations that bait premature reactions. Parrying is highly recommended over dodging in most cases, as it lets you deal counter damage and build toward breaking the boss's momentum. Key moves like Void Meteors, Unleashed Attack, and Swift Attack demand precise rhythm and attention to sound cues, making this fight a true test of reaction speed and pattern recognition.
This battle is less about gimmicks and more about endurance. With the right preparation, solid parry timing, and good use of support tools, you can survive the chaos and take down one of the game’s most aggressive boss encounters.
2. Clea

Location: Flying Manor (unlocked after defeating the four prior bosses and speaking to the Young Boy)
Clea is one of the most challenging secret bosses in Clair Obscur: Expedition 33, both mechanically and thematically. She resides at the heart of the Flying Manor, a floating island that becomes accessible once Esquie regains her flying ability in Act 3. After defeating the four bosses in the manor, speak to the Young Boy near the glass cases and proceed through the locked door. Choosing to push forward triggers one of the game’s most demanding encounters.
Clea’s signature mechanic revolves around summoning Nevrons from previous boss fights. These familiar enemies appear in complex chained attack sequences, many of which feature delayed timing, mixups, and unusual rhythms. Each time Clea begins an attack, she gathers Chroma and attempts to heal. If you fail to parry every single hit in her sequence, she restores over 600,000 HP. Even a single missed parry or dodge allows her to recover, making the fight feel like a high-stakes performance with no room for error.
Perfect parries are the only way to prevent her from healing. You must land every parry in a combo and then counter to strip away her protective Chroma. It turns the fight into a test of consistency and timing, punishing players who rely too heavily on dodging or who struggle to read attack cues under pressure.
There is, however, a way to bypass the entire ordeal. With a specialized one-shot build using Maëlle and Sciel, you can defeat Clea before she even gets a turn. This setup involves using First Strike, Marked, and Fortune’s Fury to boost Maëlle’s Stendhal to lethal levels. With proper planning and stats, it is possible to end the fight immediately. While it removes the challenge, it’s a valid option for players who want to skip the parry gauntlet.
If you choose to fight her properly, prepare for some of the most complex enemy patterns in the game. Clea summons different Nevrons such as the Musical, Violent, Agile, Tricky, and From the Deep types. Each set has its own tempo and animation quirks. Memorizing these sequences is essential, as taking even a single hit can reverse the progress you’ve made.
Clea represents the peak of mechanical difficulty in Expedition 33. Her battle is intense, precise, and unforgiving. Whether you defeat her through mastery or clever preparation, overcoming this fight marks a clear understanding of the game’s deepest systems.
1. Simon

Location: The Abyss (accessed through Renoir’s Drafts using Esquie’s underwater ability)
Simon is the most demanding boss in Clair Obscur: Expedition 33. Hidden within The Abyss, this secret fight pushes every aspect of the game to its absolute limit. Whether you opt for a carefully crafted strategy or take him on directly, this battle will test your reflexes, planning, and composure.
There are two ways to approach this fight. The first is a well-known one-shot strategy using Maelle, Sciel, and Monoco. With the right build, Maelle can eliminate Simon before he takes a turn. Sciel sets up Fortune’s Fury and Intervention, Monoco triggers Break and shields Maelle, and Maelle finishes with Stendhal after using Guard Down and Last Chance. This combo is powered by Luminas like Cheater, At Death’s Door, and First Strike, all of which are designed to amplify Maelle’s damage output in a short window. The same approach can be used again in Phase 2, as the game treats it as a separate encounter and resets key effects.
If you fight Simon without shortcuts, expect a lengthy battle with multiple phases and very little room for error. His sword-based combos evolve in each phase, becoming faster and more aggressive. In Phase 2, every slash is followed by a phantom attack, doubling the number of hits you must parry or dodge. At low health, each swing can have up to three consecutive hits, requiring near-perfect timing to survive.
The most punishing moment comes in Phase 3. Here, Simon unleashes an unavoidable attack that wipes out your entire active party instantly. The only way to survive is to have a backup team ready to take over and finish the fight. This twist forces you to build two strong parties and think beyond just the initial setup. Your second team must be able to act immediately, recover quickly, and deal enough damage to end the battle before Simon’s attacks spiral out of control again.
Simon’s arsenal includes devastating moves like Lightspeed Combo, Sword of Lumière, Shield Steal, and Chroma Shift. Some attacks cannot be dodged or parried and will drain HP or remove shields without warning. Others require parrying a dozen hits in perfect rhythm. There are no safe turns and no wasted moves in this fight.
Beating Simon the intended way is the ultimate accomplishment in Expedition 33. It demands mastery of the combat system, a deep understanding of team synergies, and the mental stamina to push through high-pressure mechanics. Whether you crush him with a perfect opener or survive a three-phase onslaught with your backup team, defeating Simon feels like a final exam that brings everything you’ve learned together in one unforgettable moment.
Clair Obscur: Expedition 33 DLC New Boss Update
Following its nine-award sweep at The Game Awards 2025, including Game of the Year, Clair Obscur: Expedition 33 received a free DLC update (called the Thank You Update) that meaningfully expands its endgame challenge. Rather than introducing entirely new enemies, the DLC revisits existing bosses and reworks them with more aggressive move sets, tighter timing windows, and new attack chains that punish old habits. These enhanced encounters demand a deeper understanding of positioning, resource management, and pattern recognition, and in several cases feel significantly harder than their original versions. Below, we take a look at the five DLC-enhanced bosses and explain why they now belong among the toughest fights in the game.
5. Chromatic Lampmaster

Location: Endless Tower
The enhanced Chromatic Lampmaster earns the lowest ranking among the new hardest bosses because its difficulty comes primarily from attrition rather than lethal pressure. The fight builds on the original Lampmaster encounter by heavily emphasizing lamp management, with many of the boss’s attacks scaling in power based on how many lamps remain lit. Destroying lamps is not optional. It is the central mechanic that determines how manageable the encounter becomes over time.
Several of the Lampmaster’s most dangerous attacks, including Flying Combo, Explosive Light, and Multi-Arm Combo, become significantly harder to deal with when multiple lamps are active. On top of that, the boss can relight lamps without consuming a turn, limiting damage windows and forcing players to prioritize Free Aim shots over raw DPS. As the fight progresses, the battlefield is repeatedly plunged into darkness, requiring players to memorize and replicate lamp-lighting patterns in order to restore visibility, sometimes even while the boss continues to apply pressure.
Despite its length and multiple lives, Chromatic Lampmaster remains one of the more consistent fights once its mechanics are understood. Its attacks are clearly telegraphed, and success depends more on discipline and execution than on reaction speed. Compared to the bosses ranked above it, the encounter is less punishing for individual mistakes, which is why it sits at the bottom of the updated list in Clair Obscur: Expedition 33.
4. Osquio

Location: Verso’s Drafts, Root of all Evil
Osquio is a mechanically intense boss that tests a player’s ability to process long, multi-stage attack sequences without losing rhythm. Found in the Root of all Evil within Verso’s Drafts, this optional fight overwhelms players not through raw damage, but through sheer volume, combining extended combo chains, layered audio-visual cues, and multiple Gradient attacks into a relentless flow.
The encounter opens deceptively, but quickly ramps up as Osquio cycles through Hard Fists, Graceful Flight, Little Friends, and Pew Pew Pew, each demanding precise timing and situational awareness. Many of these attacks include delayed strikes or uneven pacing, designed to bait early parries and punish impatience. Drop Kick and World Destruction are the most dangerous moments in the fight, requiring clean Gradient Counters to avoid severe damage and momentum loss.
Osquio also introduces the Barbapapa status effect, which can reduce damage output to nearly nothing if left unchecked. This makes mistakes especially costly, as even surviving an attack can drastically extend the fight and increase the chance of future errors. While his attacks are consistently telegraphed, the sheer length and complexity of his sequences demand sustained focus.
Once mastered, Osquio becomes manageable, but the mechanical load and endurance required still place him firmly among the hardest encounters in Clair Obscur: Expedition 33, just below the most punishing execution checks in the game.
3. Clea Unleashed

Location: Endless Tower
Clea Unleashed is one of the most unforgiving mechanical tests in the game, designed for players who have fully internalized parry timing, animation reads, and combat rhythm. Unlike most bosses, Clea’s defining mechanic, Chroma Shield, makes her completely invulnerable until every attack in a sequence is perfectly parried. Taking even a single hit allows her to immediately repeat her turn, creating a brutal feedback loop where mistakes compound rapidly.
Across three escalating phases, Clea Unleashed strings together long summon sequences composed of nearly every major Nevron archetype encountered throughout the game. These sequences are not random. They are deliberate memory and execution checks that require players to recognize patterns, anticipate transitions, and maintain composure through extended multi-hit chains with minimal recovery time.
The fight becomes especially punishing in its later stages, where Clea can summon Bourgeon to permanently remove a party member from the battle. This heavily penalizes poorly balanced teams and encourages either solo play or extremely optimized compositions where the loss of any one character does not cripple damage output. Combined with Clea’s high defense, a single misstep can turn the encounter into a drawn-out war of attrition.
Clea Unleashed is fair, readable, and meticulously designed, but it demands near-perfect execution over an extended period. That level of consistency places her among the most demanding fights in Clair Obscur: Expedition 33, surpassed only by bosses that add even harsher punishment on top of similar execution requirements.
2. Duollistes

Location: Endless Tower
Duollistes is one of the most exhausting execution checks in Clair Obscur: Expedition 33, demanding near-flawless parrying over some of the longest uninterrupted combo chains in the game. What makes this fight especially brutal is not raw damage, but the sheer volume and complexity of its attack patterns. From the moment the encounter begins, players are forced into constant reaction mode, with very few true recovery windows.
The first phase pits you against two Duallistes, one white and one black, who share a single health bar and alternate attacks in long, highly choreographed sequences. Many of these attacks range from 15 to 17 hits and frequently mix delayed strikes, downward sweeps, shadow clones, and sudden tempo changes designed to bait early parries. Moves like Duo Strike, Sneaky Combo, and Stormblood Duo require players to track which variant is attacking, recognize subtle animation cues, and maintain rhythm across extended chains with almost no margin for error.
Once their shared health bar is depleted, the fight escalates dramatically as the two merge into a single Duolliste. The second phase tightens timings, increases combo length, and introduces upgraded versions of previous attacks alongside new ones such as Relentless Combo, Long Combo Strike, and Ultimate Stormblood. While the merged form is technically more predictable, the pacing becomes faster and more punishing, with several attacks ending in Gradient strikes that can instantly swing the fight if mistimed.
Duollistes is a fight that rewards mastery and muscle memory above all else. There are no gimmicks, no shortcuts, and very little room for improvisation. Every success comes from clean reads, disciplined parries, and the ability to stay composed through relentless pressure. While it lacks the outright punishment mechanics of the top-ranked boss, the sustained mechanical load and endurance required place Duollistes firmly among the hardest encounters in the game.
1. Simon the Divergent Star

Location: Endless Tower
Simon the Divergent Star is the single most punishing encounter in Clair Obscur: Expedition 33, combining extreme mechanical precision, build checks, and outright fight-ending punishment into one relentless boss battle. This enhanced version of Simon dramatically expands on the original Abyss encounter with more health, longer combo chains, stricter execution windows, and mechanics that actively dismantle poorly planned parties.
From the very first turn, Simon establishes control. He always opens with Multi-Sweep Slash, a mandatory nine-hit sequence followed by a devastating final sword strike that must be parried or dodged. Failing this single hit immediately removes the entire active party from the Canvas, bypassing revives and defensive effects entirely. This sets the tone for the fight: Simon does not allow recovery through brute force or sloppy play. Every major sequence demands full attention.
Much of Simon’s difficulty comes from his Pillar-based attack system. During Continuous Leap Strike, Pillar Slash, and his powerful and long combo variants, pillars of light appear behind him to signal the number, spacing, and rhythm of afterimage strikes. These patterns are semi-random and can reach up to 24 hits in a single chain, forcing players to read spacing, recognize gaps, and maintain composure across extended parry windows. While the system is fair, it is brutally unforgiving, especially when combined with downward sweeps that require jump-counters mid-combo.
Simon also attacks party structure directly. Shield Steal invalidates shield-based builds entirely, while Chroma Stack is an unblockable attack that leaves an expeditioner at 1 HP, setting them up for removal. Once a character falls, Anti-Revive permanently erases them from the Canvas, meaning mistakes compound rather than reset. Near death, Simon escalates even further by triggering Canvas Removal, wiping the current party and fully restoring his health, forcing players to fight him across multiple fully built teams.
Phase two pushes the fight over the edge. Simon gains Lumière Strike, a multi-hit spinning assault that ends with a delayed finishing blow capable of outright vanishing a character, ignoring Second Chance, revival effects, and even invincibility perks. At this point, Simon becomes less about survival and more about sustained perfection. Breaking him is also a trap, as doing so grants him temporary invulnerability and a free action.
Simon the Divergent Star is not just a test of parrying skill. It is a test of preparation, endurance, and consistency across multiple teams with no safety nets. Every mistake carries permanent consequences, and every success is earned through discipline rather than luck. For these reasons, Simon stands alone as the hardest boss in the game, and the ultimate execution check in Clair Obscur: Expedition 33.

Conquering these demanding fights requires reliable hardware. When every parry and dodge matters, you need a system that delivers consistent performance without interruptions. Acer Predator PCs and laptops provide the stability and responsiveness essential for a smooth experience in Clair Obscur: Expedition 33. With high-refresh-rate screens and efficient cooling, Predator rigs help you maintain frame rates during intense battles, whether you’re countering Simon’s multi-phase onslaught or managing Serpenphare’s AP-draining attacks.
Recommended Products

Acer Nitro 60 (RTX 5070Ti)
Buy Now |

Predator Helios 18 AI (RTX 5090)
Buy Now |

Predator Triton 14 AI (RTX 5070)
Buy Now |
|---|


