Keeping track of your internet data usage is more important than many people realize. Whether you are on a capped home broadband plan, using a mobile hotspot, or trying to diagnose slow speeds and unexpected overages, knowing exactly how much data your PC is consuming can help you avoid surprise charges and performance issues. Windows 11 includes built-in tools that let you monitor network usage without installing third-party software.
This guide explains how to check internet data usage on Windows 11, what the numbers actually mean, and how to use that information to make smarter decisions about your network settings and connected apps. By the end, you will know where to find Windows 11 data usage statistics, how to reset or customize tracking periods, and when it makes sense to take additional steps to limit background data consumption.
What counts as internet data usage in Windows 11
When Windows 11 tracks internet data usage, it measures how much data is sent and received by your device over a specific network connection. This includes both visible activity, like streaming videos or downloading files, and background activity that happens without direct user input.
- Web browsing and streaming: Loading websites, watching videos, and listening to music all consume data, with video streaming using the most by far.
- App downloads and updates: Installing apps from the Microsoft Store, downloading game updates, or updating third-party software can quickly add up, especially on fresh installs or new PCs.
- Windows updates: System updates, security patches, and feature updates are included in your data usage total unless restricted by a metered connection.
- Background apps and services: Cloud sync tools, messaging apps, telemetry, and system services may use data even when you are not actively using your PC.
- Connected devices and hotspots: If your Windows 11 PC is connected through a mobile hotspot or tethered connection, all activity on that network is counted toward your usage.
It is also important to note that Windows tracks data per network, not globally. This means your data usage on Wi-Fi, Ethernet, and mobile connections is recorded separately, which is useful if you switch between home internet and capped connections.
How to check internet data usage on Windows 11

Windows 11 includes a built-in data usage tracker that shows how much internet data your device has used over time, broken down by network and app. You do not need any third-party software to access this information.
Step 1: Open the Settings app
Click the Start button, then select Settings. You can also press Windows key + I to open Settings directly.
Step 2: Go to Network & internet
In the left-hand menu, click Network & internet. This section contains all network-related settings, including Wi-Fi, Ethernet, and data usage tracking.
Step 3: Select Data usage
In Network & internet, look to the top-right corner of the window and click Data usage. You can also see your total internet usage in this area, but this figure only reflects data usage from the last 30 days. Clicking Data usage opens the full data usage dashboard.
Step 4: Choose the correct network
At the top of the Data usage page, use the drop-down menu to select the network you want to check. Windows 11 tracks data usage separately for different connection types, so make sure the selected network matches how you are connected to the internet.
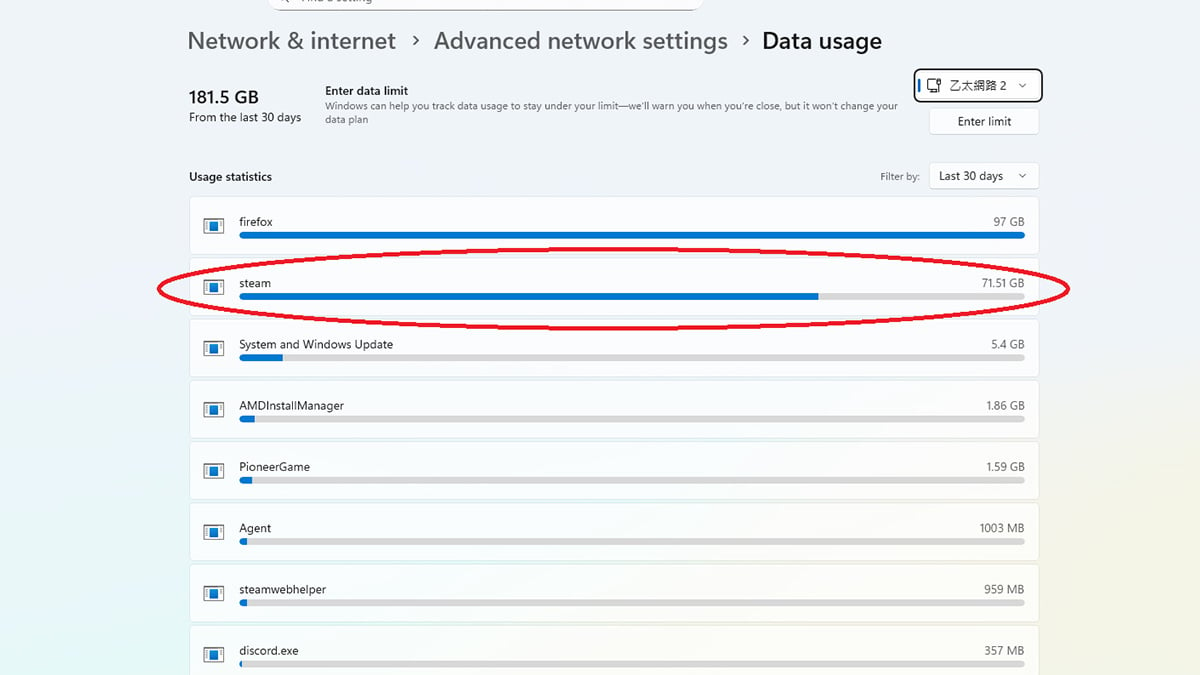
Step 5: Review total and app-level usage
On the Data usage screen, you will see:
- Total data usage for the selected network
- A breakdown by app, ranked by how much data each app has used
Above the app list, you can change the time range to view usage over the last 24 hours, 7 days, or 30 days. This helps identify short-term spikes in data use as well as apps that consistently consume large amounts of bandwidth.
How to set a data limit in Windows 11
If you are on a capped internet plan or regularly use a mobile hotspot, setting a data limit in Windows 11 can help prevent unexpected overages. When a data limit is enabled, Windows tracks your usage against that cap and provides warnings as you approach it.
Step 1: Open Data usage
Go to Settings > Network & internet, then click Data usage in the top-right corner.
Step 2: Select the correct network
Use the drop-down menu at the top of the page to choose the network you want to limit. Data limits are applied per network, so make sure you select the Wi-Fi, Ethernet, or mobile connection you want to control.
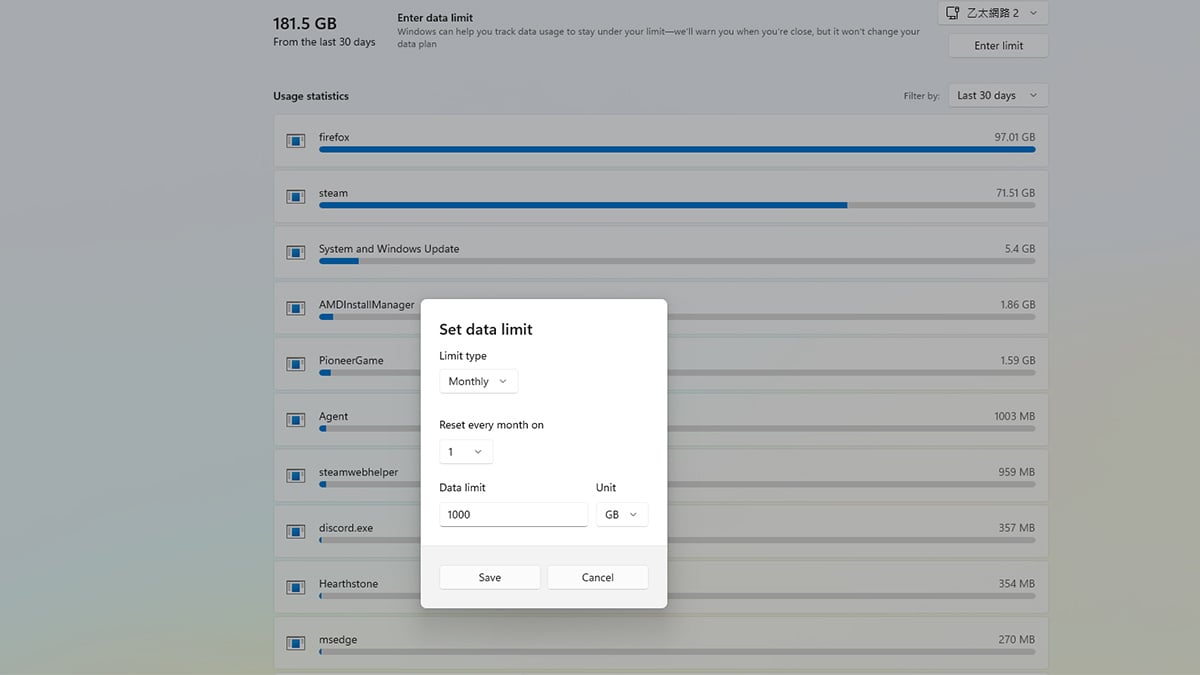
Step 3: Set a data limit
Click Enter limit under the Data usage section. In the window that appears, choose:
- The limit type (monthly, one-time, or unlimited)
- The data amount, using MB or GB (Windows 11 does not currently offer a TB option)
- The reset date, if you are using a monthly limit
Click Save to apply the data limit.
If your plan includes very high allowances, you can manually convert terabytes to gigabytes. For example, a 1 TB limit would be entered as 1024 GB.
Step 4: Monitor usage and warnings
Once a data limit is set, Windows 11 will track your usage against it. You will see warnings as you approach the limit, making it easier to adjust your activity or reduce background data usage before hitting the cap.
Note: Reaching your data limit in Windows 11 does not automatically cut off your internet connection. Instead, Windows will display warnings and notifications to let you know the limit has been reached. Your device will continue to connect to the internet unless your internet service provider enforces its own restrictions or charges for exceeding your plan. This makes the data limit a monitoring and warning tool rather than a hard cap.
Why checking internet data usage on Windows 11 matters
Monitoring your internet data usage in Windows 11 helps you stay in control of your connection, especially if you are on a capped plan or regularly switch between different networks. Even on unlimited plans, tracking usage can reveal performance issues or apps that consume more bandwidth than expected.
Common reasons to check data usage include:
- Avoiding data overages: If your internet service provider enforces monthly limits, monitoring usage helps prevent extra charges or throttling.
- Identifying bandwidth-heavy apps: Browsers, streaming services, cloud storage tools, and game launchers can consume large amounts of data, sometimes in the background.
- Troubleshooting slow internet speeds: Unexpected spikes in data usage can explain sudden slowdowns, especially on shared or metered connections.
- Managing mobile hotspots: When using tethering or hotspot data, tracking usage helps avoid exhausting limited data allowances.
- Understanding how shared computers are used: On family PCs, data usage can reveal whether time was spent on schoolwork or on bandwidth-heavy activities like gaming. Large spikes tied to game platforms may indicate downloads or online play that happened while you were away.
- Understanding background activity: Windows updates, app updates, and system services may use data even when your PC appears idle.
This context makes it easier to decide whether to set data limits, restrict background apps, or change how your PC connects to the internet.
Final thoughts
Windows 11 makes it easy to check internet data usage without relying on third-party tools. By understanding where to find usage statistics, how data is tracked per network, and how to set a data limit, you gain better visibility into how your PC uses the internet day to day.
Whether you are trying to avoid data overages, troubleshoot slow connections, manage shared computers, or keep an eye on background activity, Windows 11’s built-in data usage tools give you the information you need to make informed decisions. A quick check now and then can help prevent surprises and keep your internet usage under control.
FAQ
Does Windows 11 show internet data usage in real time?
No. Windows 11 updates data usage statistics periodically, not in real time. While the numbers are generally accurate, there may be a short delay before recent activity appears in the Data usage dashboard.
Why does Windows 11 only show data usage for the last 30 days?
By default, Windows 11 tracks internet data usage over a rolling 30-day period. This timeframe cannot be extended automatically, but you can reset the tracking period manually or align it with your billing cycle by setting a data limit.
Can Windows 11 track data usage for all Wi-Fi networks combined?
No. Windows 11 tracks data usage per network, not across all connections. Each Wi-Fi network, Ethernet connection, or mobile network has its own usage history and data limit settings.
Does setting a data limit stop my internet connection?
No. Setting a data limit in Windows 11 does not block internet access. It only provides warnings and notifications when you approach or exceed the limit. Any speed throttling or service interruption is controlled by your internet service provider, not Windows.
Why is my data usage so high even when I am not using my PC?
High data usage can be caused by background activity such as Windows updates, app updates, cloud sync services, game launcher downloads, or other apps running in the background. Checking the app-level breakdown in Data usage can help identify the cause.
Can I reset data usage statistics in Windows 11?
Yes. You can reset data usage for a specific network by going to Settings > Network & internet > Data usage, selecting the network, and choosing the reset option. This clears the usage history and starts a new tracking period.
Is Windows 11 data usage accurate compared to my ISP?
Windows 11 provides a good estimate, but it may not exactly match your ISP’s numbers. Internet providers measure data at the network level, while Windows tracks usage at the device level, which can result in small differences.
Recommended Products


