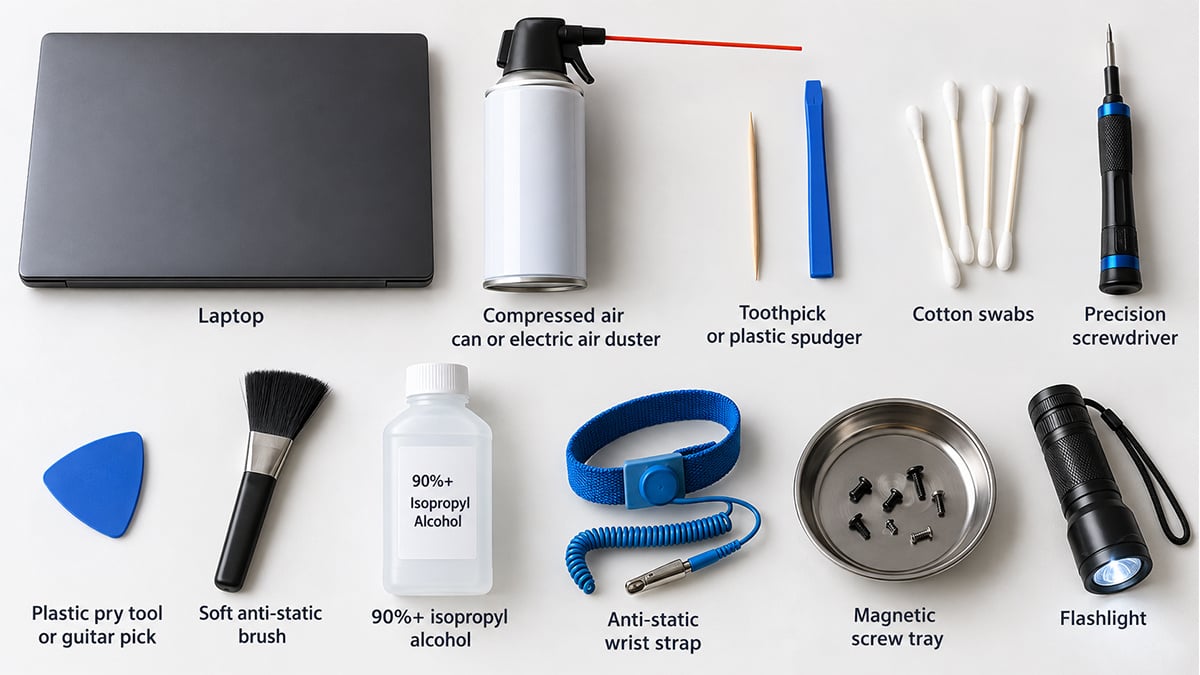
To clean a laptop fan, shut the laptop down completely, unplug it, and blow compressed air through the intake and exhaust vents in 1 to 2 second bursts while holding the fan blades still. For a deeper clean, remove the bottom panel, disconnect the battery, and clear dust from the fan blades and heatsink fins with compressed air, a soft brush, and 90%+ isopropyl alcohol. The vent-only method takes about 10 minutes and needs no tools beyond a can of air. The full clean takes 20 to 40 minutes and removes the dense dust mat that forms between the fan and the heatsink, which compressed air through the vents often cannot reach. Dust is the most common cause of a loud, hot laptop. A clogged heatsink forces the fan to spin faster for the same cooling, and once it maxes out, the CPU and GPU reduce their clock speeds to stay within temperature limits. That is called thermal throttling, and on a gaming laptop it shows up as lower FPS and stutter.
7 signs your laptop fan needs cleaning If your laptop shows two or more of these signs, dust buildup is the likely cause.
Sign
What it usually means
Fan runs loud during light tasks (browsing, email, video)
Airflow is restricted, so the fan spins faster to move the same heat
Fan ramps to full speed within minutes of gaming
The heatsink fin stack is partly blocked
FPS drops or stutter after 10 to 20 minutes of play
CPU or GPU is thermal throttling
Keyboard deck, palm rest, or bottom panel feels hotter than it used to
Heat is soaking into the chassis instead of leaving through the exhaust
Weak or barely warm air from the exhaust vents
Dust mat is blocking the fins; heat is trapped inside
Visible gray fuzz in the vents
Buildup has reached the vent grille; there is usually more inside
Sudden shutdowns under load
The system hit its critical temperature limit and powered off to protect itself
A rattling, grinding, or clicking noise is different. That points to a worn bearing or a loose object touching the blades. Cleaning can fix the second cause but not the first (see When cleaning is not enough).
How often should you clean a laptop fan? Clean the vents every 3 to 6 months and do a full internal clean every 12 months. Adjust for your environment:
Environment
Vent clean
Full internal clean
Clean office or desk, no pets
Every 6 months
Every 12 to 18 months
Gaming laptop used daily
Every 3 months
Every 12 months
Home with pets or carpet
Every 2 to 3 months
Every 6 to 12 months
Used on a bed, couch, or lap
Every 2 to 3 months
Every 6 months
Smoking household or workshop dust
Monthly
Every 6 months
Fabric surfaces are the biggest accelerator. Most laptops pull air in through the bottom panel, so a bed or couch both blocks the intake and feeds lint straight into the fan.
Tools you need to clean a laptop fan
Method 1 needs only the first two items. Method 2 needs the full list.
Tool
Purpose
Method 1
Method 2
Compressed air can or electric air duster
Blows dust off blades and heatsink fins
Yes
Yes
Toothpick, plastic spudger, or cotton swab
Holds fan blades still while you blow air
Yes
Yes
Precision screwdriver (usually Phillips #0 or #00; some models use Torx T5)
Removes bottom panel screws
No
Yes
Plastic pry tool or guitar pick
Releases bottom panel clips without scratching
No
Yes
Soft anti-static brush or clean paintbrush
Lifts packed dust from blades and fins
No
Yes
90% or higher isopropyl alcohol + cotton swabs
Removes sticky grime from blades (evaporates without residue)
No
Yes
Anti-static wrist strap (or touch bare metal first)
Prevents static discharge into the motherboard
No
Yes
Magnetic tray or labeled paper
Keeps screws of different lengths in their original positions
No
Yes
Flashlight
Checks the fin stack for remaining dust
Optional
Yes
Avoid a vacuum cleaner. Household vacuums build static charge at the nozzle, and the suction can spin the fan far past its rated speed.
Method 1: How to clean a laptop fan without opening it (10 minutes)
This method clears loose dust from the vents and fan blades. It works well as routine maintenance but will not remove a compacted dust mat on the heatsink.
Shut down fully. Use Shut down, not Sleep or Hibernate. On Windows, hold Shift while clicking Shut down to skip Fast Startup so the system is completely off.Unplug the charger and every accessory. Wait 5 minutes so internal components cool down.Find the intake and exhaust vents. Intakes are usually grilles on the bottom panel, sometimes above the keyboard. Exhausts are on the rear edge or sides, where hot air comes out when the laptop is running.Hold the can upright. Tilting or shaking compressed air can spray liquid propellant, which is freezing cold and can leave residue.Stop the fan from spinning. Look through the bottom grille and gently press a toothpick or plastic spudger against one fan blade. If you cannot reach the blade, keep bursts very short.Blow into the intake vents first. Use 1 to 2 second bursts from about 5 to 10 cm (2 to 4 inches) away, angled so air travels toward the exhaust. This pushes dust out the way it naturally flows.Blow short bursts into the exhaust vents. This loosens debris stuck on the outside of the heatsink fins.Repeat the intake bursts. Loosened debris from step 7 now gets pushed out the exhaust.Wipe the vent grilles. Use a dry microfiber cloth or a cotton swab to remove dust stuck to the grille itself.Power on and listen. The fan should be quieter at idle and the exhaust air should feel warmer under load, which means heat is leaving the chassis again.If a cloud of dust comes out of the exhaust on the first burst, the fin stack was heavily blocked. Plan a full clean with Method 2.
Method 2: How to clean a laptop fan by opening the bottom panel (20 to 40 minutes)
This is the method that fixes serious overheating. Most dust collects where the fan pushes air into the heatsink fins, forming a felt-like mat that blocks airflow. You can only reach it from inside.
Before you start, check your laptop's warranty terms and the manufacturer's service manual for your exact model. Screw locations, clip placement, and battery connectors vary by model.
Step 1: Prepare the laptop and workspace Shut down fully (Shift + Shut down on Windows) and unplug the charger. Work on a hard table, not carpet. Discharge static by touching a grounded metal object, or wear an anti-static wrist strap. Close the lid and place the laptop upside down on a soft cloth to protect the lid. Step 2: Remove the bottom panel Remove every visible screw on the bottom panel. Place each screw on a labeled sheet or magnetic mat in the same layout as the panel, since lengths often differ. Check for hidden screws under rubber feet, stickers, or rear hinge covers. Insert a plastic pry tool at a rear corner or near the hinge, where panels usually have the most give. Slide it along the edge to release the clips one at a time. Lift the panel slowly. Some laptops have cables or speakers attached to the panel, so check before pulling it away. Step 3: Disconnect the battery Locate the battery connector where the battery cable meets the motherboard. Pull the connector straight out using the plastic tab or a pry tool, not the wires. Press and hold the power button for 15 to 30 seconds to drain residual charge. Skipping this step is the most common way DIY cleaning damages a motherboard. Even when the laptop is off, the board still receives power from the battery.
Step 4: Clean the fan blades Hold the fan still with a toothpick or spudger resting against one blade. Blow compressed air across the blades in 1 to 2 second bursts, rotating the fan by hand between bursts so every blade gets cleared. For sticky grime (common near kitchens or with smoking), dip a cotton swab in 90%+ isopropyl alcohol, squeeze out excess, and wipe each blade. Let it dry for 5 minutes. Look into the fan hub. Hair wrapped around the hub causes rattling and should be removed with tweezers. Step 5: Clean the heatsink fin stack Find where the fan outlet meets the copper or aluminum fins. This is where the dust mat forms. If a gray mat is visible, lift it off with tweezers or a soft brush. Do not push it into the fins. Blow compressed air from the fan side outward through the fins, so dust exits through the exhaust vent and not back into the fan. Shine a flashlight through the exhaust vent. You should see clear gaps between every fin. Gaming laptops often have two fans (one for the CPU, one for the GPU) and several fin stacks on the rear and side edges. Clean each one.
Step 6: Optional fan removal for a deep clean If the fan housing is heavily packed, you can remove the fan. Disconnect its small power cable from the motherboard, remove the 2 to 4 screws holding it, and lift it out. Some fans have a removable cover plate that exposes the full blade assembly. Leave the heatsink in place unless you also plan to replace thermal paste.
Step 7: Reassemble and test Reconnect the fan cable (if removed) and the battery connector. Make sure both are fully seated. Align the bottom panel, press the edges until each clip snaps in, and reinstall screws in their original positions. Do not overtighten; plastic threads strip easily. Power on. Confirm the fan spins at boot and run the temperature test in the next section. 8 mistakes that damage laptop fans
Mistake
Why it causes damage
Do this instead
Letting compressed air spin the fan freely
Overspeed wears the bearing, and a spinning motor acts as a generator that can push voltage back into the fan controller
Hold the blades still with a toothpick or spudger
Holding the can upside down or at a steep angle
Sprays liquid propellant that freezes components and can leave residue
Keep the can upright, use short bursts
Using a household vacuum
Builds static charge and can overspin the fan
Use compressed air or an electric duster
Cleaning while the laptop is on or sleeping
Risk of short circuit and fan damage while powered
Shut down fully and unplug
Skipping battery disconnection (Method 2)
Tools or loose screws can short live circuits
Unplug the battery connector first
Spraying oil or WD-40 into the fan
Most laptop fans use sealed sleeve or fluid bearings; oil attracts dust and degrades plastics
Replace a noisy bearing fan instead
Using water or low-concentration alcohol
Water is conductive and dries slowly
Use 90%+ isopropyl alcohol, sparingly
Blowing dust from the exhaust side into the fan housing
Pushes the dust mat back into the fan and fins
Clear the mat by hand, then blow from the fan side outward
How to check if cleaning worked Measure temperatures before and after cleaning under the same load. A successful clean typically lowers load temperatures by several degrees and reduces how often the fan hits full speed.
Install a monitoring tool. HWiNFO64, Core Temp, or HWMonitor show CPU and GPU temperatures, clock speeds, and fan RPM. Acer Predator owners can also use PredatorSense.Record idle temps. Let the laptop sit on the desktop for 5 minutes with the charger connected, then note CPU and GPU temperatures.Run a repeatable load. Use a 10 minute Cinebench multi-core run for the CPU, or the same game at the same settings for 15 minutes.Record peak temps and clock speeds. Check whether HWiNFO flags "thermal throttling" in the CPU section.Repeat after cleaning with the same room temperature, power mode, and surface.Typical laptop temperature ranges State
Typical CPU temp
What to watch for
Idle or light use
35 to 55°C
Consistently above 60°C at idle suggests blocked airflow or background load
Office work and streaming
45 to 70°C
Loud fan at this level points to dust
Gaming or rendering (gaming laptops)
75 to 95°C
Sustained readings at the chip's limit, combined with falling clock speeds, mean throttling
Modern Intel and AMD mobile processors are designed to run close to their thermal limits under heavy load, so a high number alone is not a fault. Falling clock speeds and dropping FPS are the real signs of a cooling problem.
When cleaning is not enough If temperatures stay high after a thorough Method 2 clean, the problem is usually the thermal interface or the fan itself.
Symptom after cleaning
Likely cause
Fix
Temps still high, fan runs at full speed
Dried thermal paste between chip and heatsink (common after 2 to 4 years)
Replace thermal paste, or have a service center do it
Grinding, clicking, or rattling that changes with fan speed
Worn fan bearing
Replace the fan with the model-specific part
Fan does not spin when the laptop is hot
Failed fan motor, loose cable, or firmware issue
Reseat the fan cable, update BIOS, then replace the fan
"Fan error" message at boot
Fan not detected or not reaching expected RPM
Check the cable connection, then replace the fan
Temps normal on desk, high on lap
Blocked bottom intake
Use a hard surface or a laptop stand
Some gaming laptops use liquid metal instead of standard thermal paste. Liquid metal is electrically conductive and requires a different process, so check your model's documentation before repasting.
How to keep a laptop fan clean longer Use the laptop on a hard, flat surface. A stand that raises the rear 2 to 5 cm improves intake airflow. Keep pets off the desk and away from the vents when the laptop is running. Blow out the vents every 3 months, even if the laptop seems fine. Use your manufacturer's fan control software. On Acer Predator laptops, PredatorSense lets you set fan curves and performance modes, which helps you spot a fan that runs louder than it used to. A note on metal fan blades Many premium gaming laptops now use metal fan blades that are far thinner than standard plastic ones. Acer's AeroBlade 3D blades, for example, are 0.1 mm thick. Clean them with air and a soft brush only, and never press on the blades or scrape them with a tool.
Conclusion: clean fans, cool performance A laptop fan clean takes 10 to 40 minutes and is the single most effective fix for a loud, hot laptop. Blow out the vents every 3 months, open the bottom panel once a year, and track your temperatures before and after so you know the clean worked.
Regular cleaning keeps any laptop running well, but cooling design sets the ceiling. If you are shopping for a gaming laptop that stays cool and quiet under sustained load, the Predator Helios Neo 16 AI, a powerful gaming laptop , is built around it.
The Helios Neo 16 AI uses Acer's 5th Gen AeroBlade 3D Fan technology with vector heat pipes. AeroBlade 3D fans use all-metal blades just 0.1 mm thick, 87.5% thinner than a typical 0.8 mm plastic blade. That allows up to 59 blades per fan and, according to Acer's modeling, up to 35% more airflow and 26% less noise than generic plastic fans. PredatorSense, on a dedicated hotkey, gives you real-time control of fan curves, performance modes, and system temperatures, so you can see exactly how your cooling is performing.
Spec
Predator Helios Neo 16 AI (PHN16-I71-905P)
Processor
Intel Core Ultra 9 290HX Plus, 24 cores (8P + 16E), up to 5.5 GHz
Graphics
NVIDIA GeForce RTX 5070 Ti Laptop GPU, 12 GB GDDR7
Display
16" WQXGA (2560 x 1600) 16:10 IPS, 240 Hz
Memory
16 GB DDR5 (2 slots)
Storage
512 GB PCIe NVMe Gen 4 SSD
Cooling
5th Gen AeroBlade 3D fans, vector heat pipes, PredatorSense fan control
Connectivity
Killer Wi-Fi 6E, Killer Ethernet E3100G, Thunderbolt 4
Operating system
Windows 11 Home
Pair a well-engineered cooling system with a simple cleaning routine, and your laptop will hold its performance for years. Shop the Predator Helios Neo 16 AI on the Acer Store.
Laptop fan cleaning FAQ Can I clean a laptop fan without opening it? Yes. Blow compressed air through the intake and exhaust vents in 1 to 2 second bursts while holding the fan still. This removes loose dust but not the compacted mat on the heatsink, which requires removing the bottom panel.
Is compressed air safe for laptop fans? Yes, if you hold the can upright, use short bursts, and stop the blades from spinning. Letting air spin the fan past its rated speed can wear the bearing and damage the fan circuit.
How long does it take to clean a laptop fan? A vent-only clean takes about 10 minutes. A full clean with the bottom panel removed takes 20 to 40 minutes, depending on the number of screws and fans.
Why is my laptop fan so loud? The most common cause is dust restricting airflow, which forces the fan to spin faster. Other causes include heavy background processes, a high-performance power mode, a blocked intake on a soft surface, or a worn bearing.
Does cleaning a laptop fan improve performance? Yes, when the laptop was thermal throttling. A clean heatsink lets the CPU and GPU hold higher clock speeds for longer, which means steadier FPS in games and faster renders.
Can I use a vacuum to clean my laptop fan? No. A household vacuum can build static charge and spin the fan too fast. Use compressed air or an electric air duster instead.
Can I use a hair dryer to clean a laptop fan? No. Hair dryers move too little air to dislodge packed dust, and hot air adds heat to components you are trying to cool.
Will opening my laptop void the warranty? It depends on the manufacturer and region. Read your warranty terms before removing the bottom panel, or ask an authorized service center to do the cleaning.
What alcohol should I use to clean laptop fan blades? Use isopropyl alcohol at 90% concentration or higher. It evaporates quickly without residue. Lower concentrations contain more water and dry slowly.
Recommended Products